

Module: Images#
Create AI-generated images quickly by describing in natural language what you want. The Images module uses GPT Image by OpenAI, Gemini (Nano Banana) by Google, and FLUX by Black Forest Labs from Germany.
Prompt#
Describe the image you want to generate as precisely as possible. We translate your prompt into English because the image generators work best with it.
Add details: adjectives, locations, and art styles such as digital art, watercolor, or photorealistic.
Specify what the background should look like. Lighting moods such as morning sun or golden hour are also possible.
The term hyper-realistic produces an image that looks as realistic as possible.
With FLUX, you have even more control over the result. If you enter the prompt in English, it will not be translated and will be passed to the image generator unchanged.
You can find more tips for creating good prompts in the Guide to Perfect AI Images
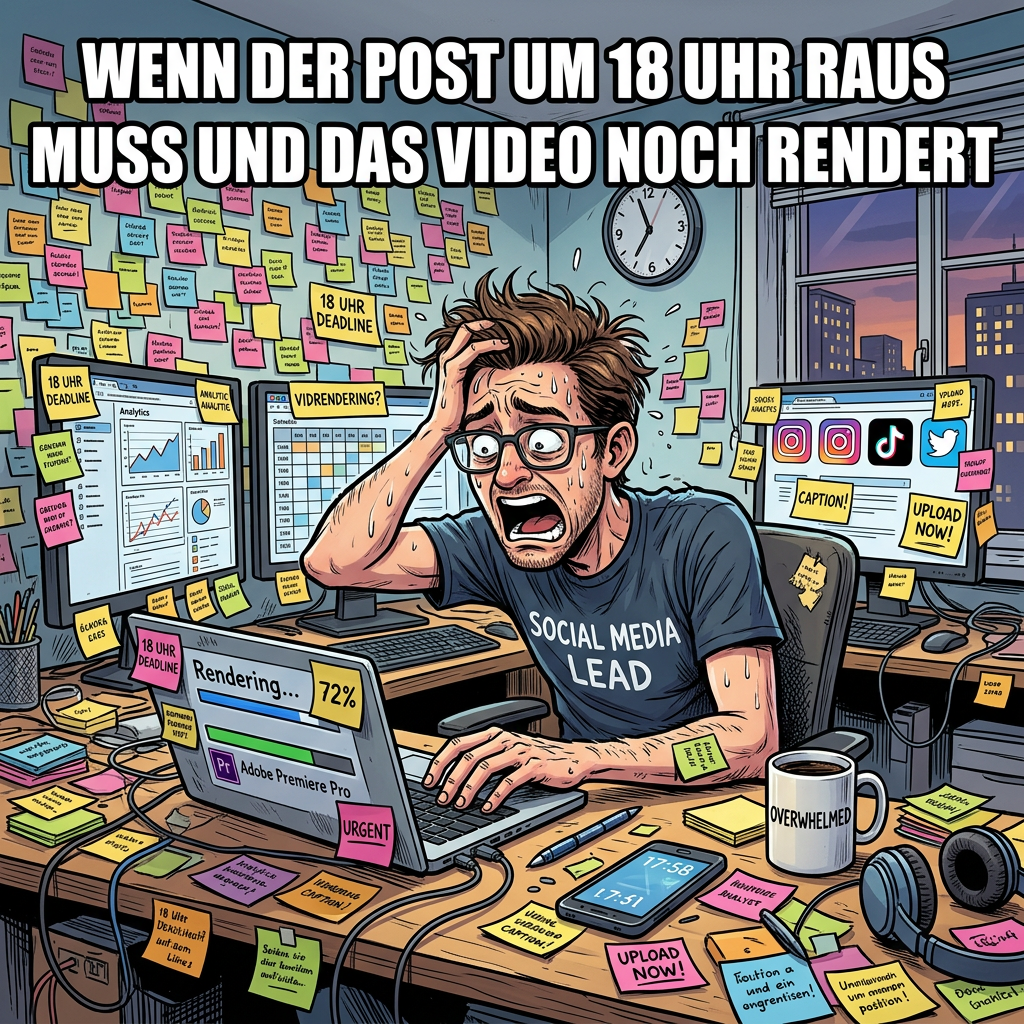
Image Prompt Example#
Create a square image in a comic style. A stressed social media manager is sitting in a sea of Post-its. In the center of the image, in bold white Impact font (meme style), it says: ‘WHEN THE POST HAS TO GO LIVE AT 6 PM AND THE VIDEO IS STILL RENDERING’.
Magic Wand#
Whether the image turns out the way you imagine depends heavily on the description in the prompt.
The more precisely you describe what you want, the better the result will be.
Some models work better when prompted in English. For those models, the AI-Tools automatically translate your prompt into English.
Some models respond to so-called negative prompts. These are instructions that describe what should not be included in the image. With other models, this does not work as well.
To help you get good results quickly, use the Magic Wand. It automatically improves your prompt and knows the strengths of the different image generators.
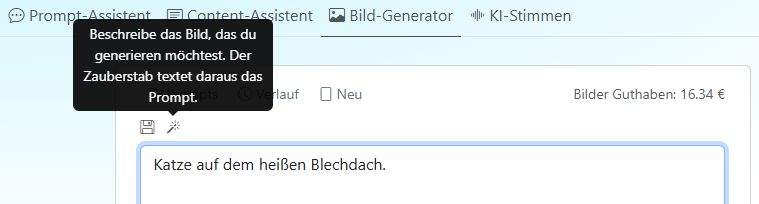
Magic Wand Example#
With the Magic Wand, your input Cat on the hot tin roof becomes:
Cat walking on a hot tin roof, soft sunlight, slightly steaming surface, modern realistic style, urban setting with light blue and orange accents, view from slightly below, warm atmosphere, focus on the cat and the texture of the roof.
And this is the result using FLUX.2 Pro as the image generator:
History#
The history shows all images you have generated over the past 14 days. Click the History button to open the image history.
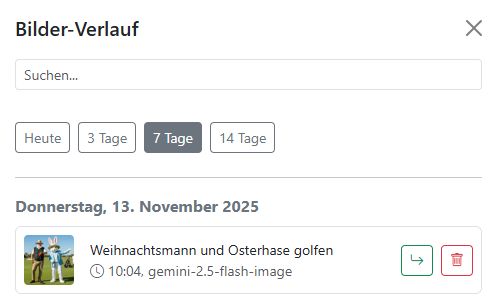
You can open individual images or delete them from the history.
You can use the search function to look for specific terms.
The Today, 3 Days, 7 Days, and 14 Days buttons help you filter the history. In addition to the generated image, all image generator settings are also saved so you can continue working with them.
Images older than 14 days are deleted automatically.
New#
Use the New button to clear the prompt field. Then you are ready for the next image.
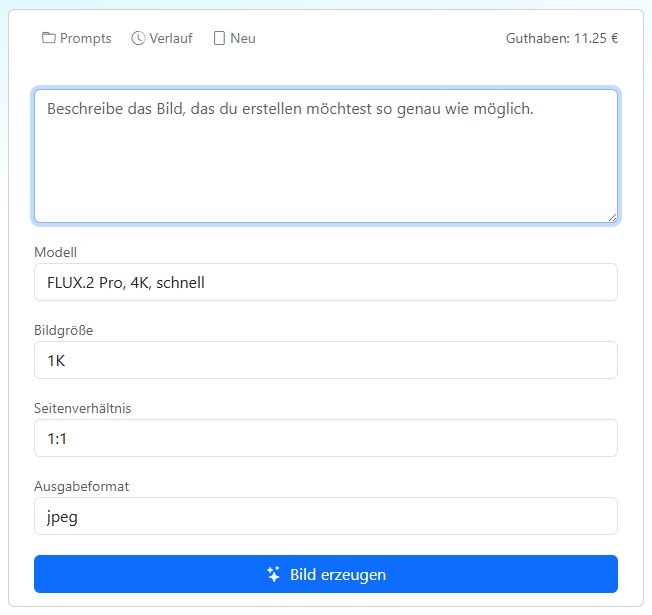
Models#
At the moment, you can choose between GPT Image by OpenAI, Gemini (Nano Banana) by Google, and several FLUX models by Black Forest Labs from Germany’s Black Forest region.
The most powerful image generators are Gemini, the FLUX models, and GPT Image. They can also process input images. On the input image, you can mark regions that should be replaced or modified. With FLUX, you can also expand images. The FLUX models are among the fastest image generators available.
GPT Image#
OpenAI’s image generator is available in the GPT Image 2, GPT Image 1.5 and GPT Image 1 versions. GPT Image 2 can retrieve information from the internet and create sophisticated infographics.
Image size: Choose an image size from the drop-down menu. The value indicates how many pixels the image should contain: 1K, 2K, or 4K.
Aspect ratio: Choose an aspect ratio for your image: 1:1, 16:9, 4:3, and more.
Quality: For most applications, generating images in medium quality is sufficient. However, if you need a high-quality image with greater visual depth and complexity, choose “high”.
Output format: Choose PNG, JPEG, or WEBP from the drop-down menu. JPEG is the best format for photos. WEBP is a modern image format developed by Google that offers high compression with good image quality.
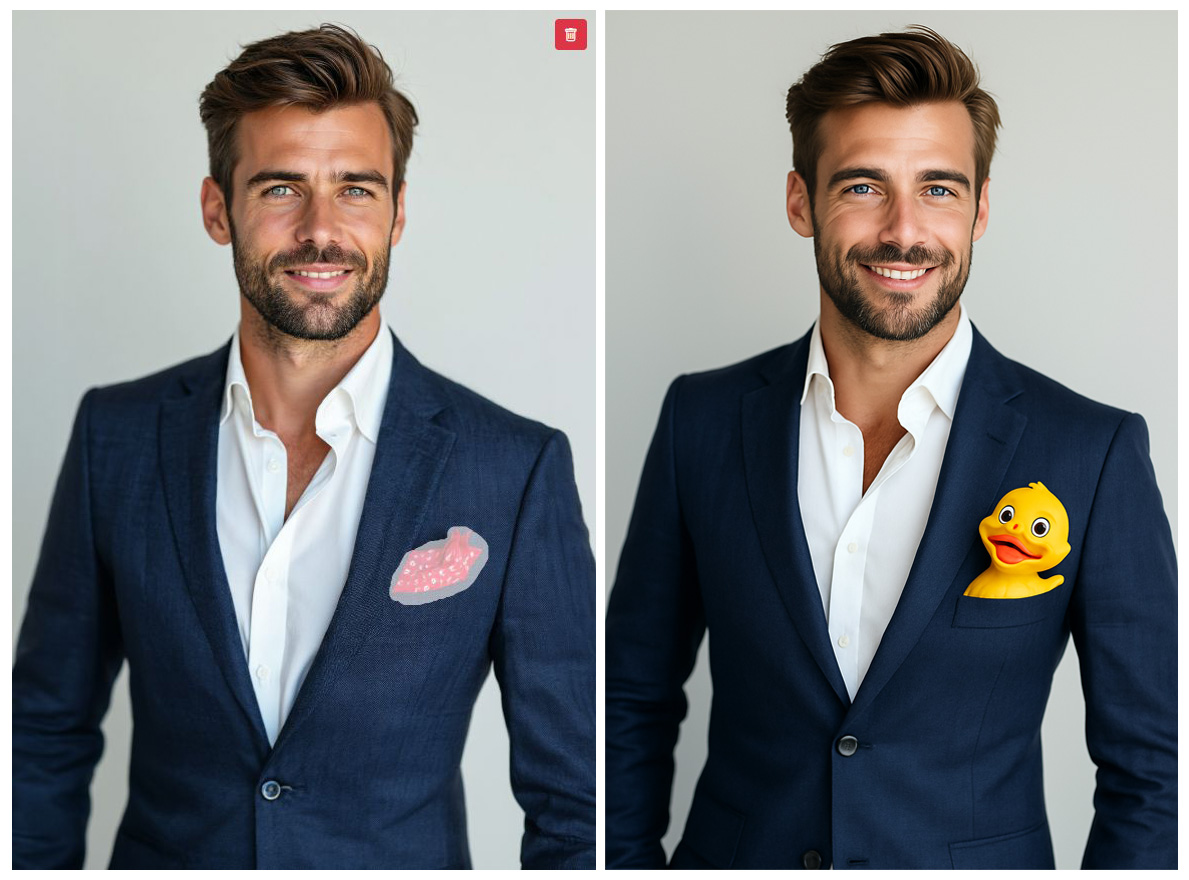
Input images: You can upload up to 16 input images. On the first image, you can use the brush to mark areas that should be changed. In the prompt, describe how these areas should be changed and what should be generated from the input images.
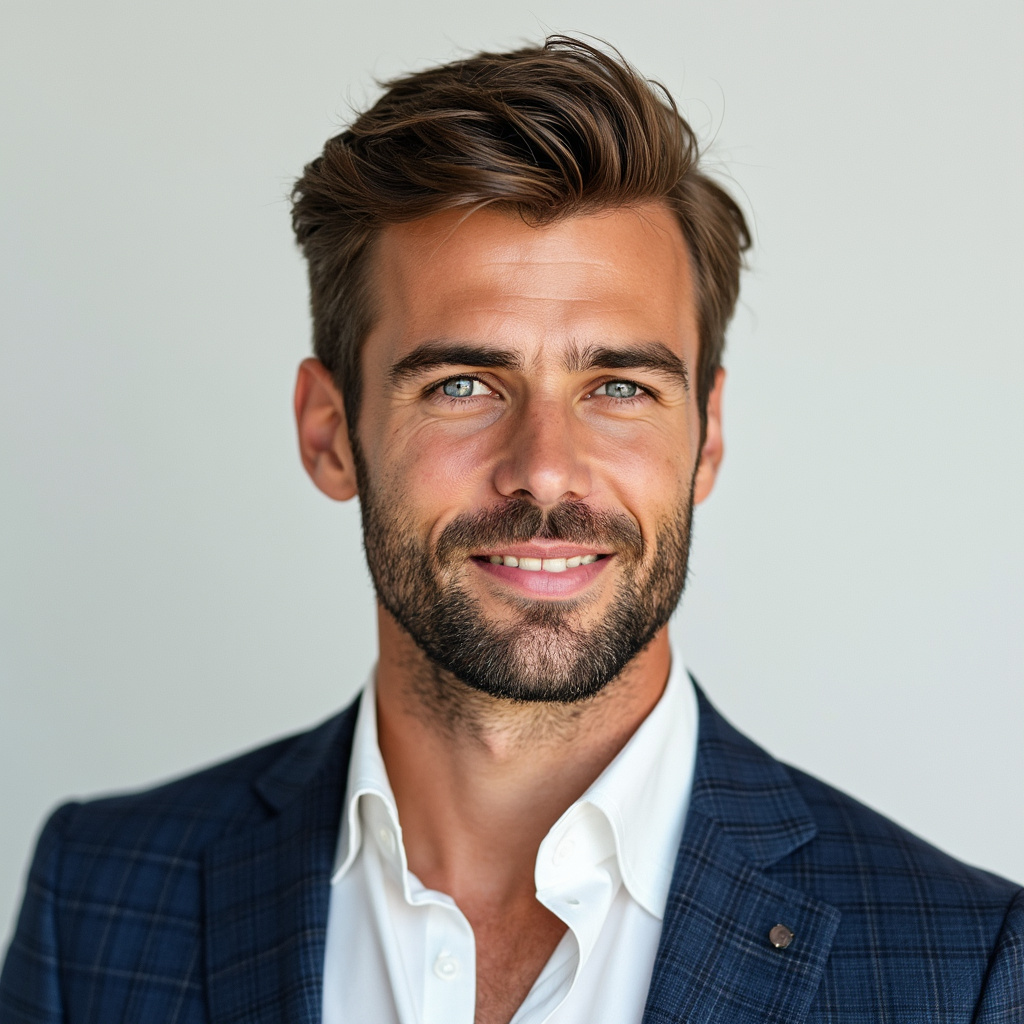
In the following example, we uploaded an image of a man in a suit. Then we marked the pocket square in white with the brush and prompted: “Man with a duck instead of a pocket square”. The result is an image of a man in a suit with a duck peeking out from the lapel.
Important
To use GPT Image, you need to verify your OpenAI account once.
Go to the GPT Image verification guide
As long as the account is not verified, the following error message appears:
Your organization must be verified to use the model gpt-image-1.
Gemini#
The Gemini image generator is also known as Nano Banana. It is fast and creates high-quality images. You can use detailed prompts to describe the scene you want precisely.
Input images: You can upload several input images. Google recommends using no more than 3 images. In the prompt, describe what should be generated from the input images.
Aspect ratio: Choose an aspect ratio for your image: 1:1, 16:9, 4:3, and more. If you select Like input image, Gemini uses the aspect ratio of the last uploaded image.
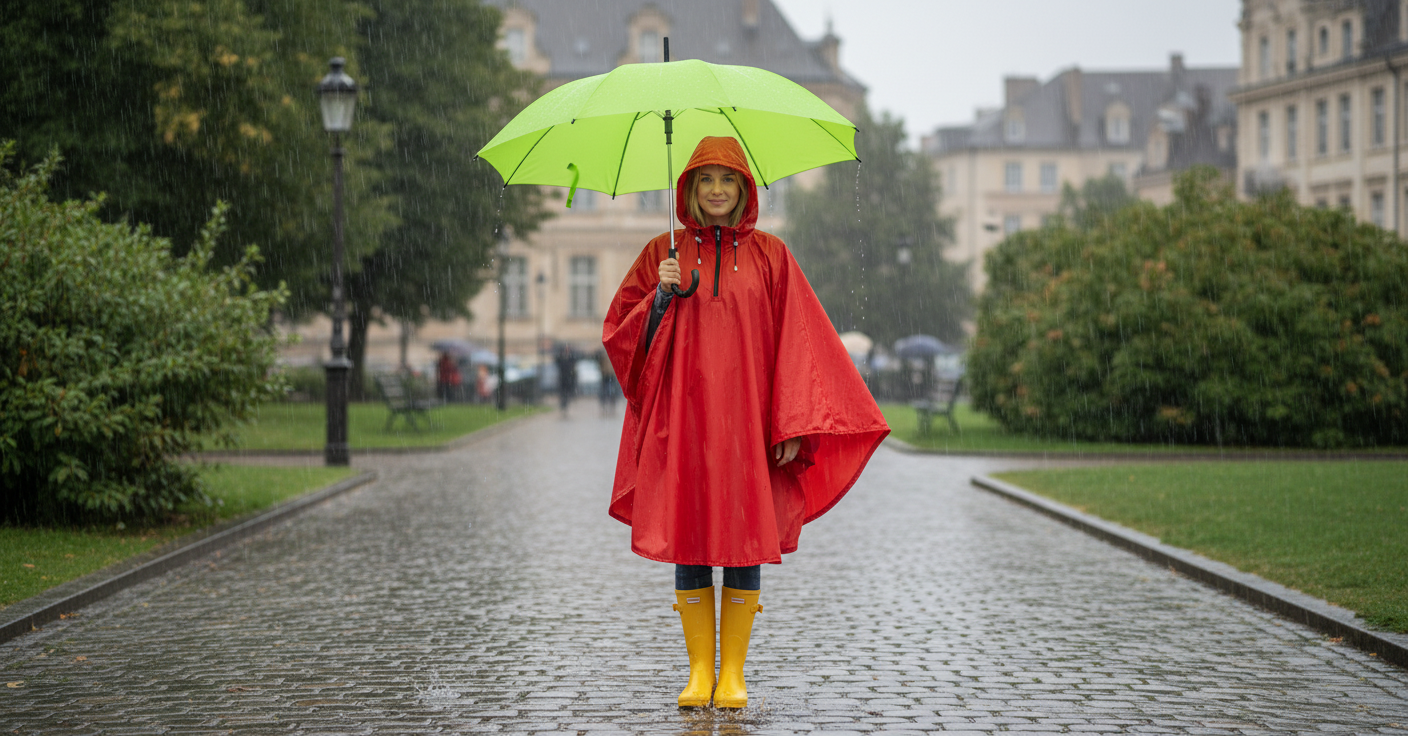
With Gemini, you can combine several images into a new one. In the following example, we dressed the presenter from the studio in rubber boots and a raincoat. We also put an umbrella in her hand.
For this, we uploaded the following four images:
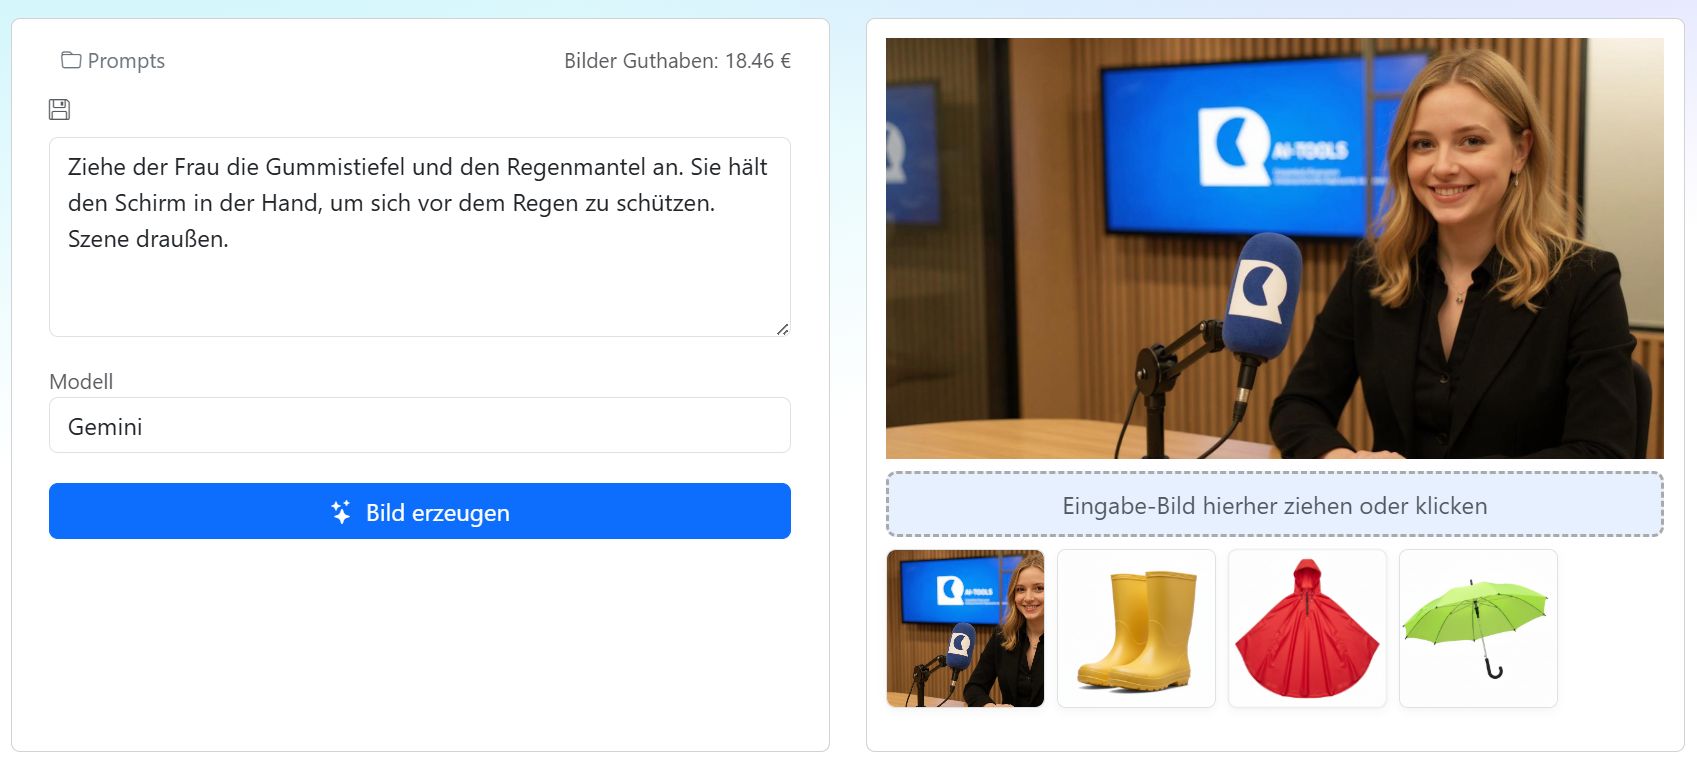
The prompt used:
Put rubber boots and a raincoat on the woman. She is holding the umbrella in her hand to protect herself from the rain. Outdoor scene.
We reorder the images with the mouse using drag and drop so that the 16:9 studio shot moves to the last position. Gemini uses the aspect ratio of the last image.
The result:
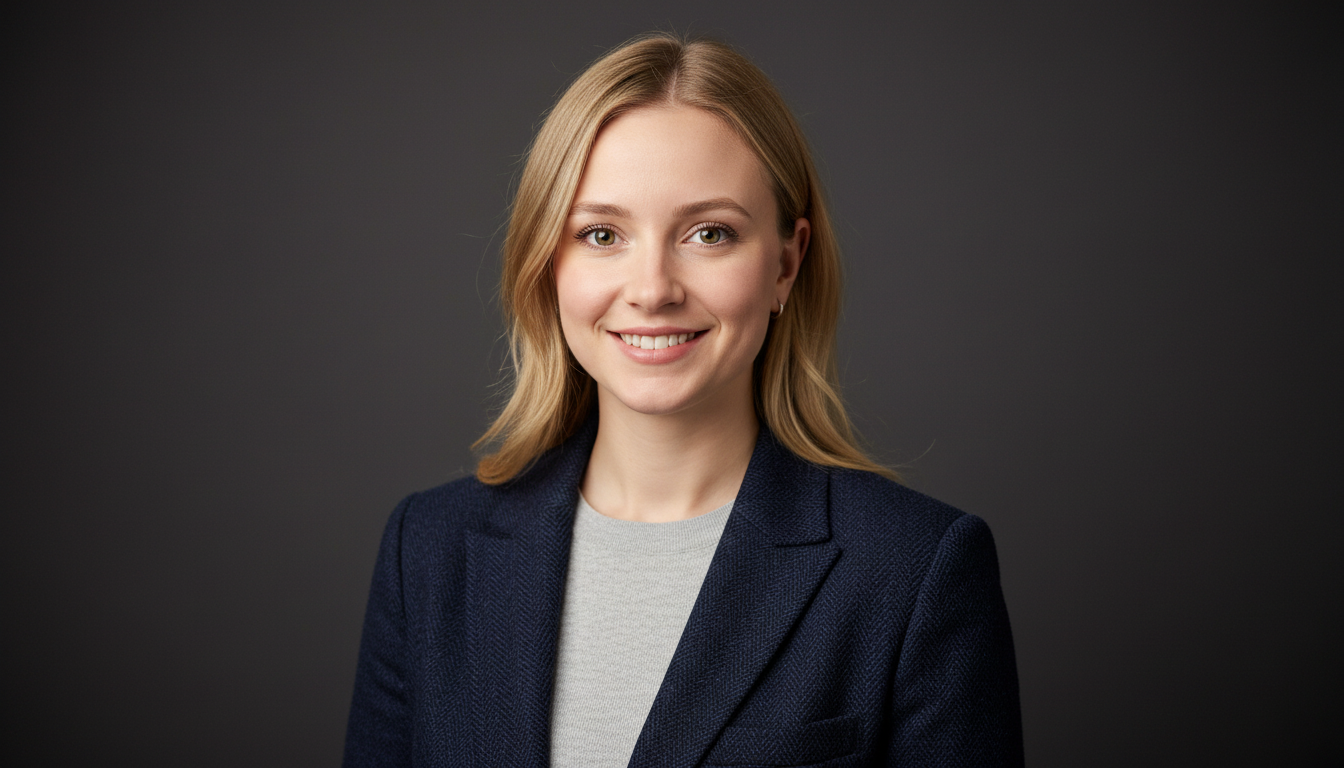
Professional profile picture:
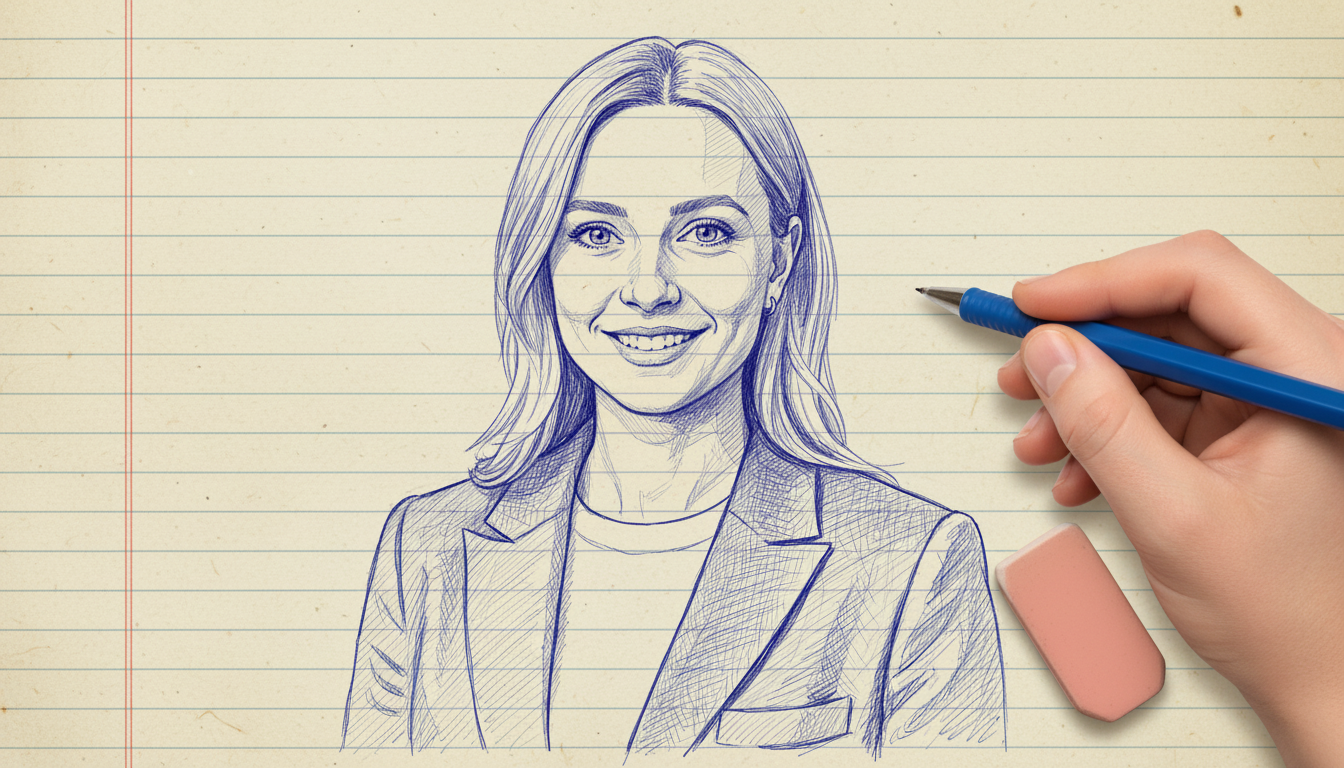
Line drawing:
Gemini 3#
For images in very high resolution, for infographics, or for images that should be generated from many input images, use Gemini 3 or the faster Gemini 3.1.
Gemini 3 is especially good at rendering text in infographics. You can generate resolutions up to 4K. This can take longer than with Gemini and costs are roughly 4 to 6 times higher.
Tip
You can also use Gemini 3 with the assistants:
Visit the website sprit-spion.de and summarize what users can do there. Using that information, generate a landscape image with an infographic in German that clearly explains how sprit-spion works.

Nano Banana#
The Gemini image generators have been given the nickname “Nano Banana”. Naming convention:
Gemini = Nano Banana
Gemini 3 = Nano Banana Pro
Gemini 3.1 = Nano Banana 2
FLUX.2#
FLUX.2 is available in the Pro, Max, Flex, and Klein variants. These models generate images in resolutions up to 4K and are faster and more affordable than Gemini 3. Social media memes with embedded text are a particular strength of FLUX.2, as are infographics.
FLUX.2 Pro: Very fast. Good with text—only Gemini 3 Pro performs even better here. The best choice for most applications.
FLUX.2 Max: Highest quality for graphic design, product images, and video stills. Can retrieve information from the internet.
FLUX.2 Flex: Very high quality. Prompt adherence can be adjusted using a slider.
FLUX.2 Klein: A very fast and inexpensive model for simple tasks.
With FLUX.2, you can generate images created from many input images.
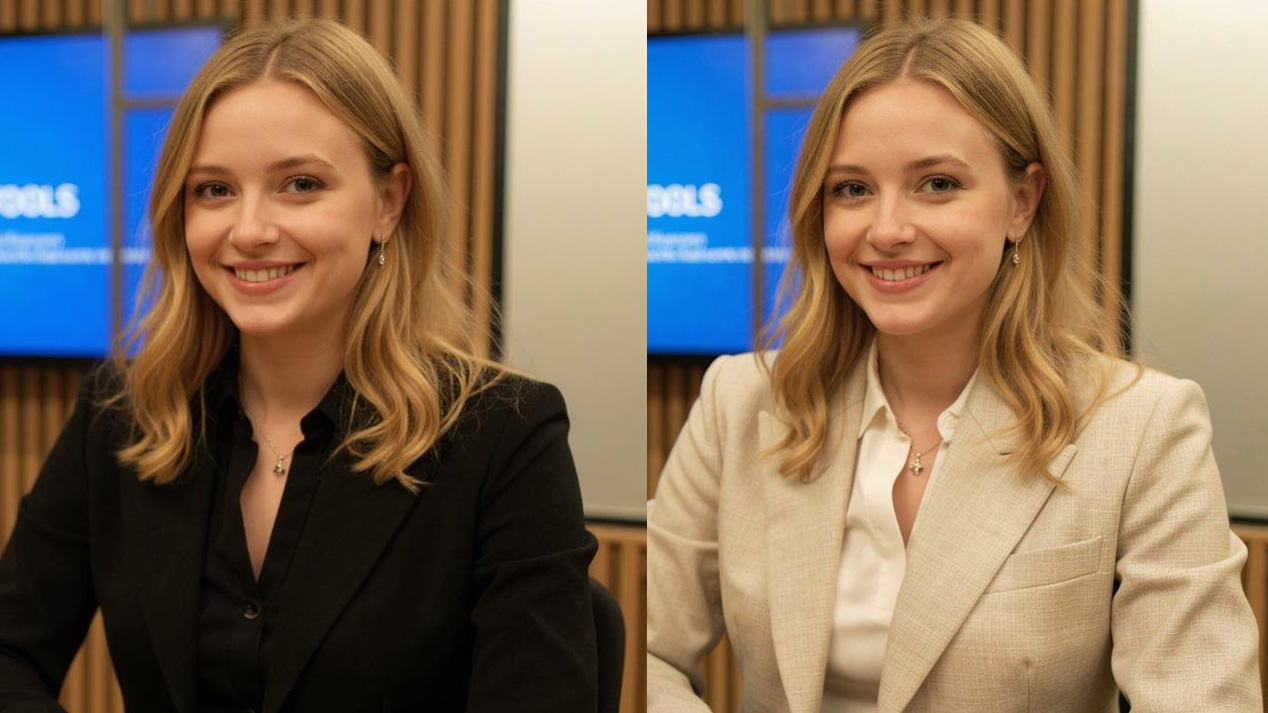
Or edit an input image:
Change the woman’s jacket in the image to a light beige color.
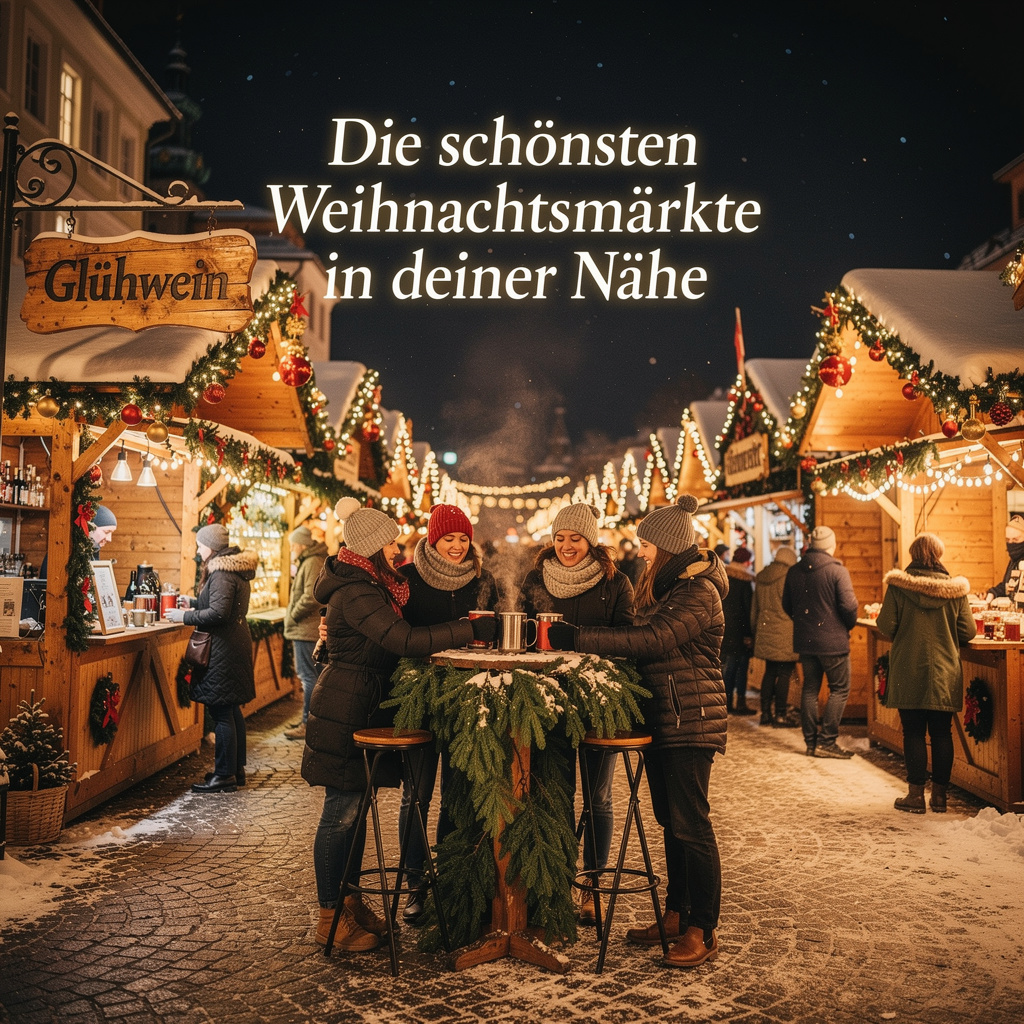
Example: Social Media Meme#
Describe the scene as precisely as possible and add that the text in the image should appear in a specific font.
Festive Christmas market at night, sparkling lights and decorated stalls, in the foreground people enjoy mulled wine at a standing table decorated with fir branches, lively atmosphere, warm colors, modern social-media meme aesthetic. Wooden sign on one stall with the word “Mulled Wine”. The street and stalls are lightly covered with snow. “The most beautiful Christmas markets near you” appears in elegant white lettering centered above the market. Clear dark night sky. A few stars are visible in the sky.
FLUX Context#
FLUX Context is available in the Pro and Max variants (maximum performance). With these models, you can create images and edit them very effectively—for example, improve quality, remove objects from an image, or edit people.
At the same time, FLUX Context largely preserves the character of the person. With prompts, you can change facial expressions, gestures, body posture, clothing, or camera position.
Input images: Upload an input image that you want to edit. FLUX Context is excellent for image editing. Try prompts like: “Improve image quality”, “Remove object XY”, or “Show the woman in the image in a half-profile looking to the right.” You can upload up to 4 images. In the prompt, describe what should be generated from the input images. Working with multiple images is still experimental in FLUX Context.
Aspect ratio: Choose an aspect ratio for your image: 1:1, 16:9, 4:3, and more.
In the following example, we uploaded the Radio Creator logo mark as the input image and generated an image of a female radio presenter with a blue microphone.
We then applied the following prompt to the generated image:
Remove the microphone and show the woman in the image in half-profile, looking to the left.
Show the woman outdoors in a summery outfit.
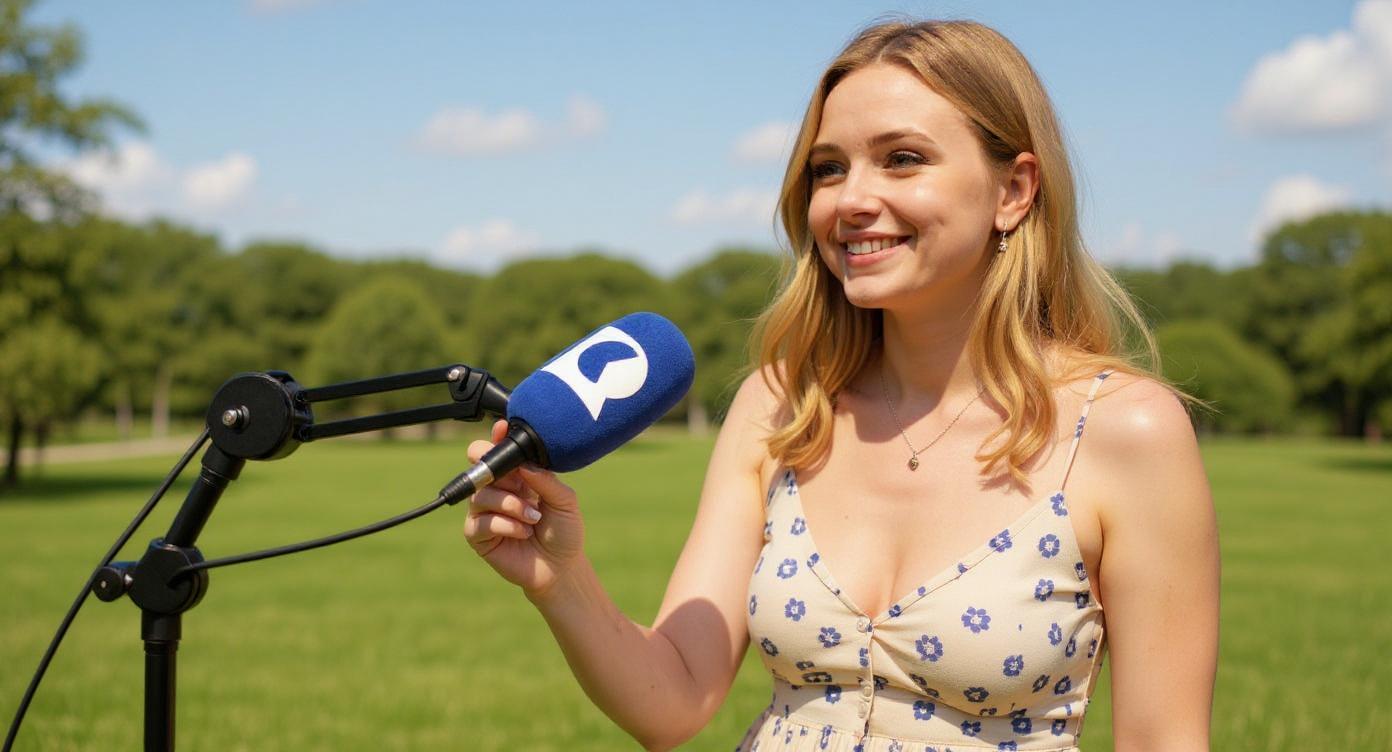
Show the woman outdoors wearing a logo T-shirt and holding a microphone.
FLUX Pro#
Image size: Choose an image format from the drop-down menu. The image size is given in pixels.
Input image: You can also upload an input image. It serves as an image prompt that the image generator uses as a reference. Minimum size: 256 x 256 pixels.
FLUX Ultra#
With FLUX Ultra and FLUX Pro, you can upload an input image in addition to a text prompt. The uploaded image works like an additional prompt that the AI uses as a reference. You can adopt content, structures, or the composition from this image. You can also have the image generated in other styles or with different colors.
Neon sign from a logo#
In the following example, we uploaded the Radio Creator wordmark as the input image. In the prompt, we instructed the AI to turn it into a neon-red sign on a dark wall.
Aspect ratio: Choose an aspect ratio for your image: 1:1, 16:9, 4:3, and more.
Style: You can choose between “natural” and “vivid”. The natural style is softer and less saturated, while the vivid style has stronger colors and contrasts.
Input image: You can also upload an input image. It serves as an image prompt that the image generator uses as a reference. Minimum size: 256 x 256 pixels.
Input image strength: Use this slider to adjust how strongly the image prompt should influence the result.
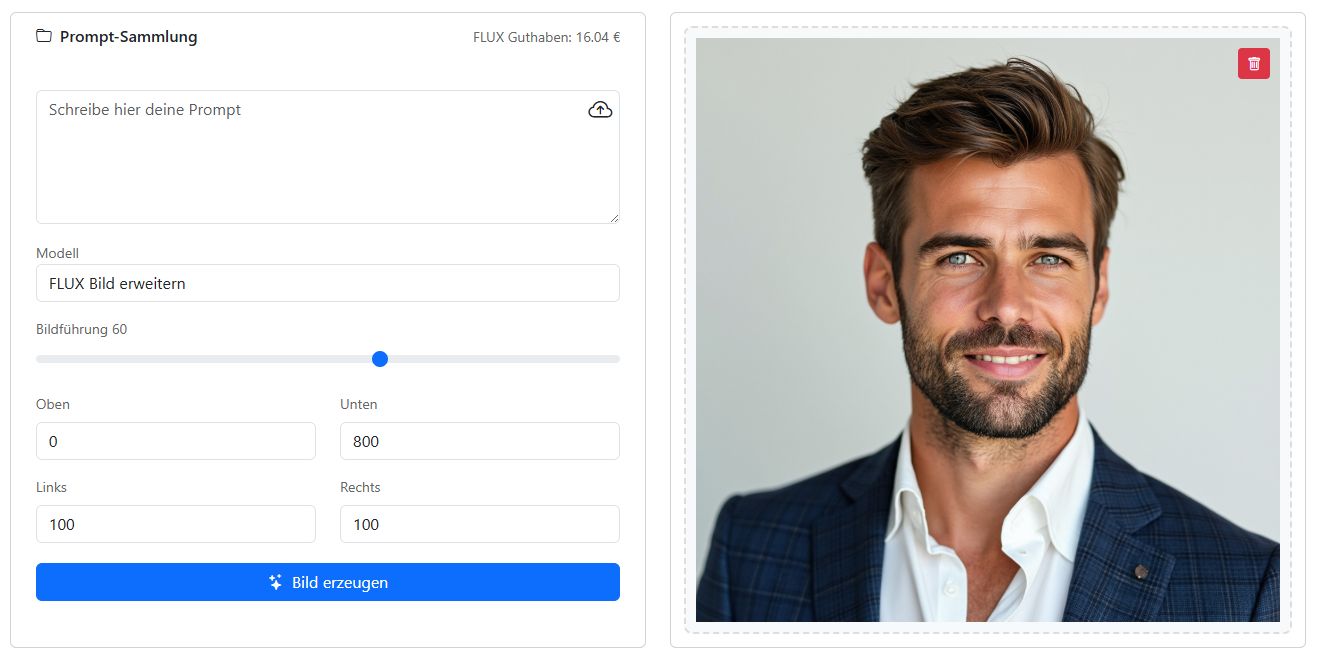
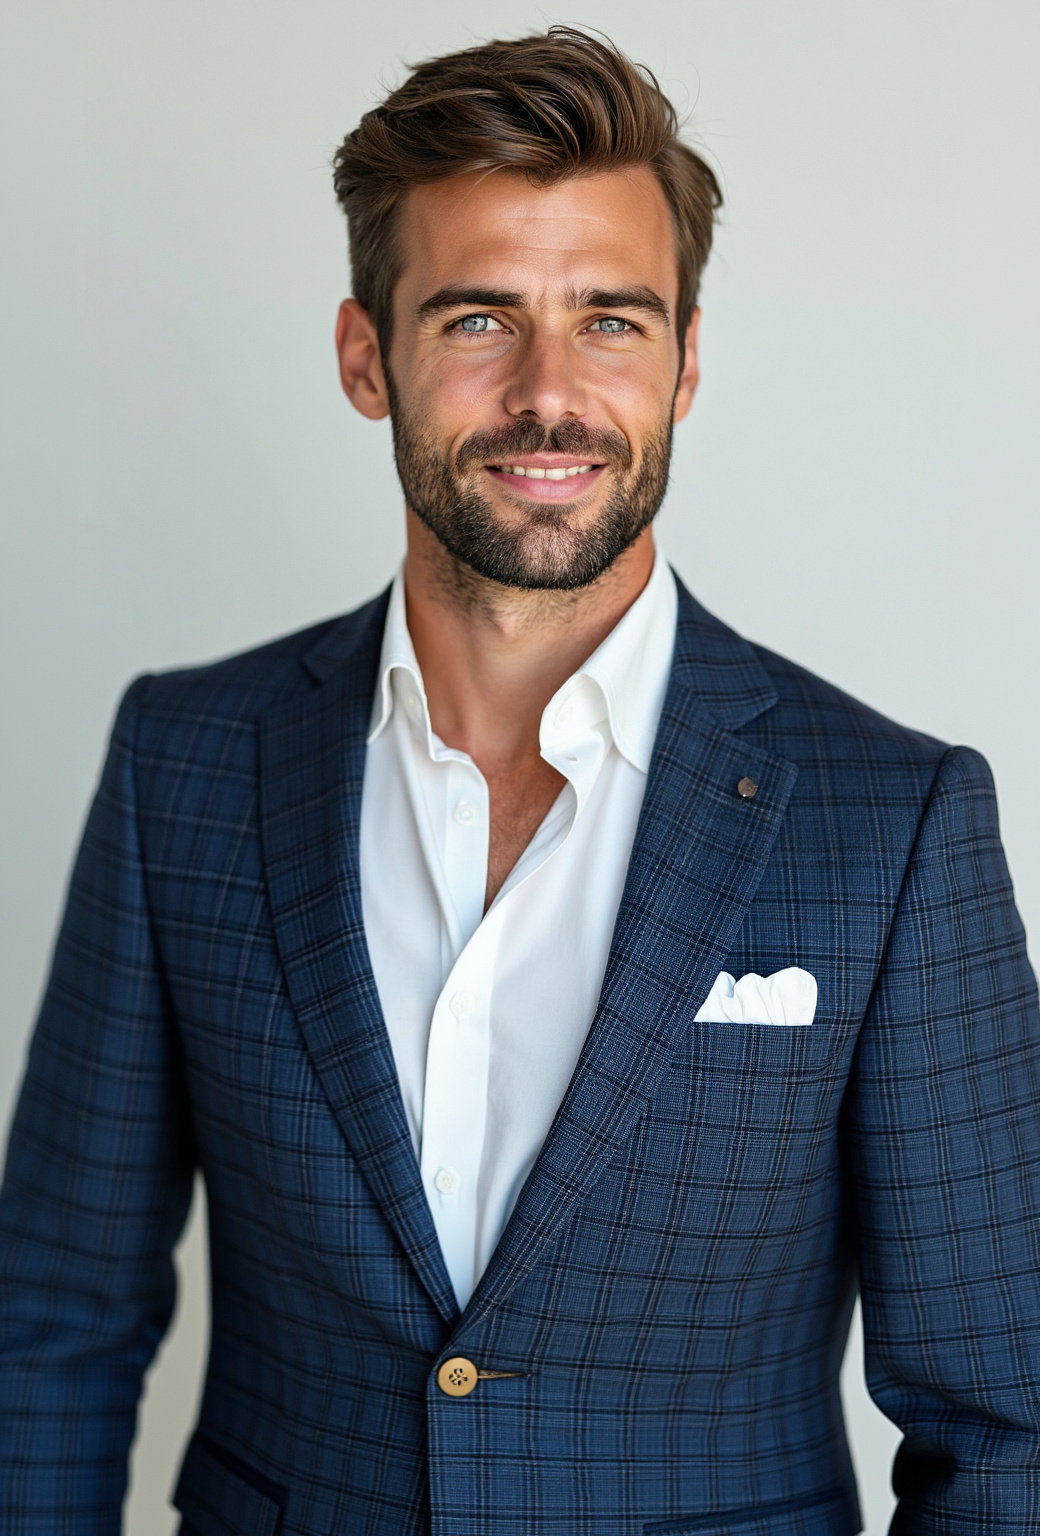
FLUX Expand Image#
Portrait format from a square#
Do you have an image, but the aspect ratio does not fit? With FLUX Expand Image, you can adjust the image without distorting it—for example, turning a square image into a portrait format.
The following example shows the image editor for expanding an image. We uploaded a square profile picture and expanded it without a text prompt by simply specifying how many pixels the image should be extended in each direction.
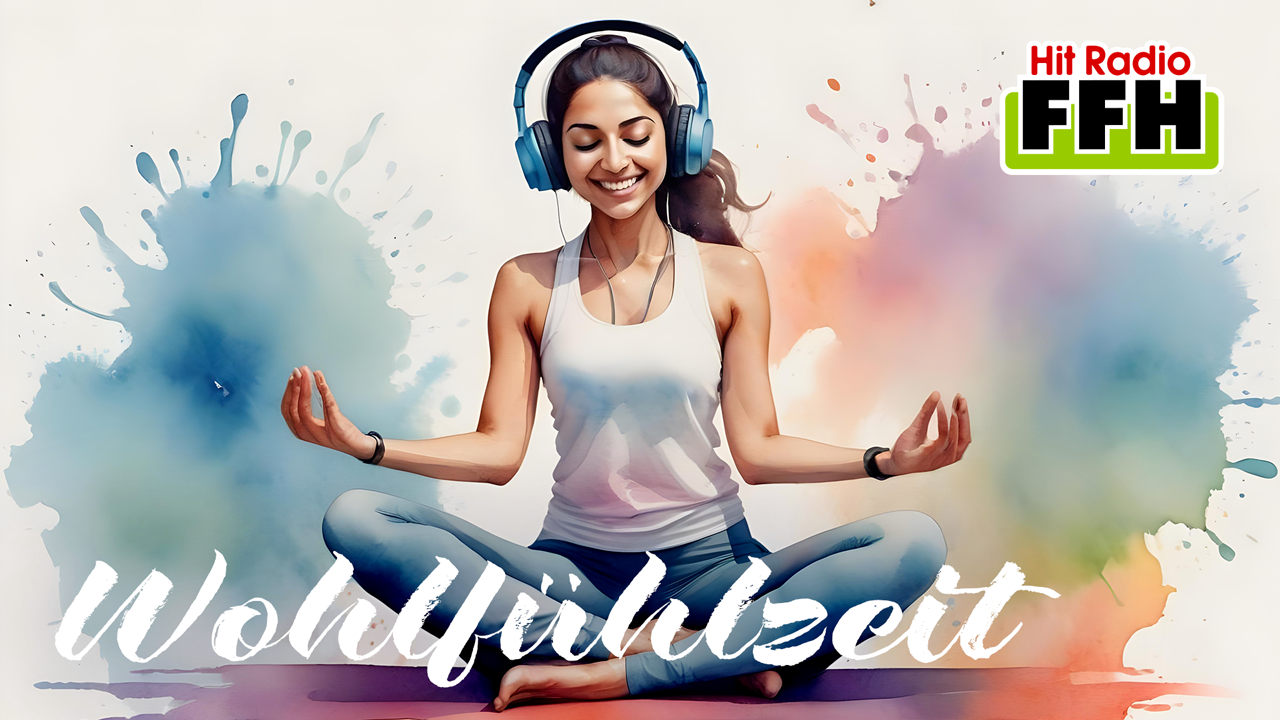
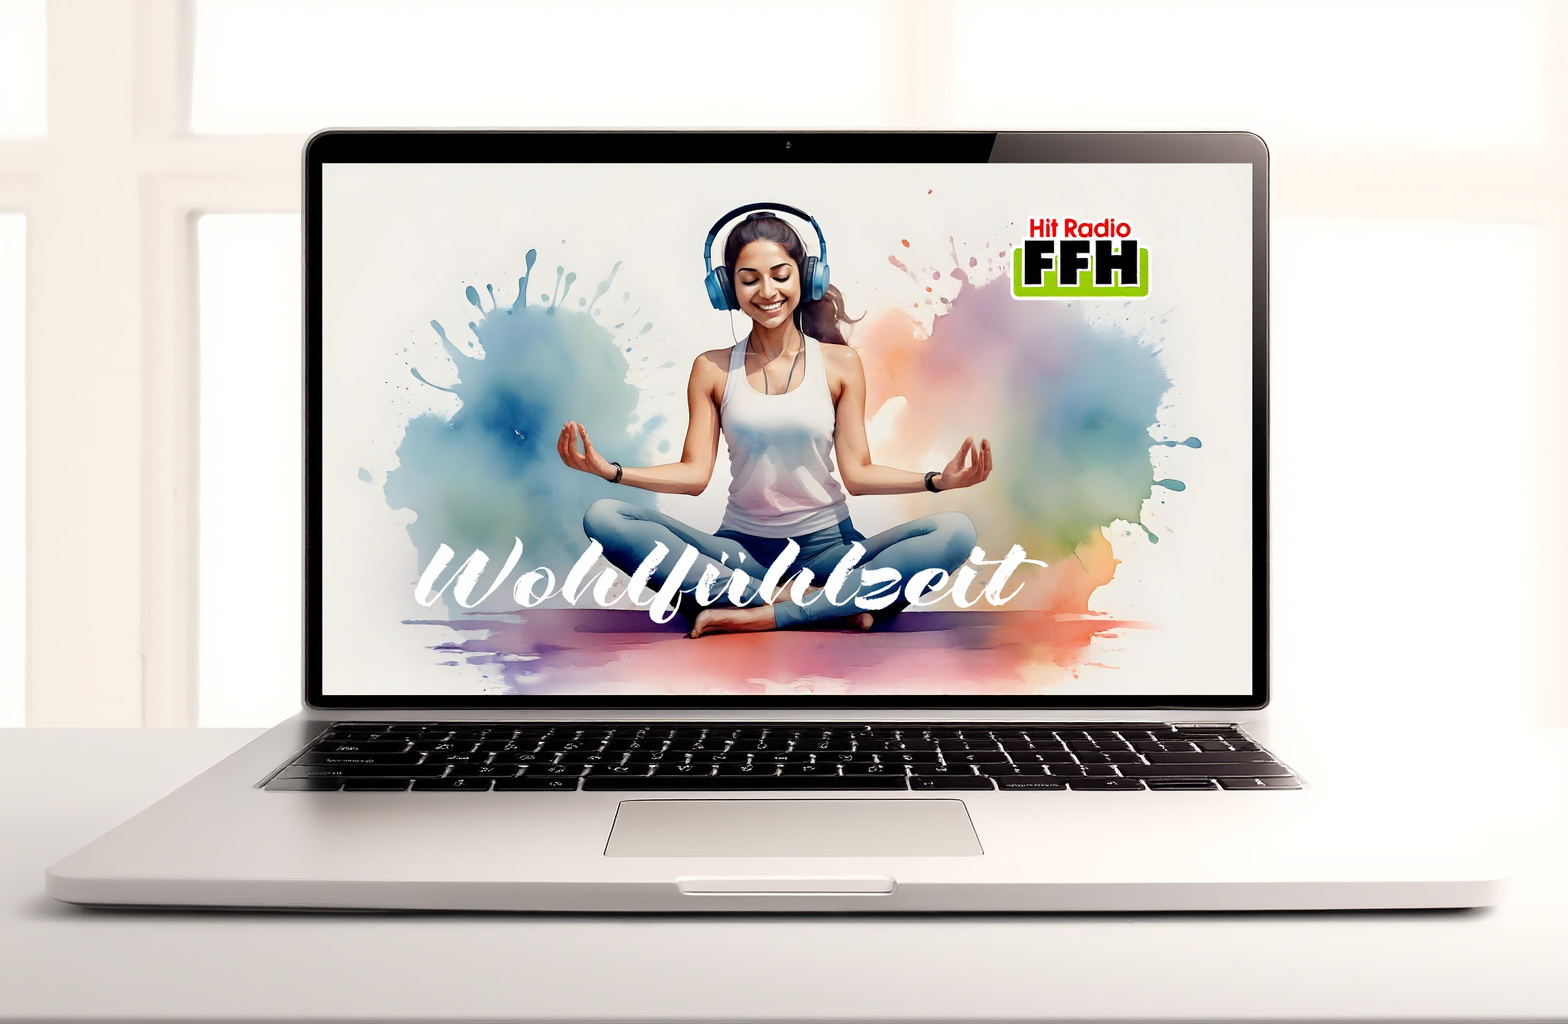
Display a cover on a laptop#
The task in the next example: display the cover of the podcast “Wohlfühlzeit” on a laptop screen. We specified that the image should be expanded on all sides. In the text prompt, we instructed the AI that the expanded image areas should form a laptop.
Input image: Upload the image you want to expand.
Image guidance: Specify how strongly the input image should influence the expanded areas.
Top, bottom, left, right: Specify by how many pixels the image should be expanded on each side.
FLUX Replace Image Parts#
In the uploaded image, mark the parts that the AI should change. The rest of the image remains untouched. If you select FLUX Replace Image Parts and upload an input image, painting tools appear below the image. You can use them to mark in white all regions the AI should work on. This creates what is called a mask. Use the slider to adjust the brush and eraser stroke width.
Sometimes it is faster to first mark the image parts that should not be changed and then click the invert icon.
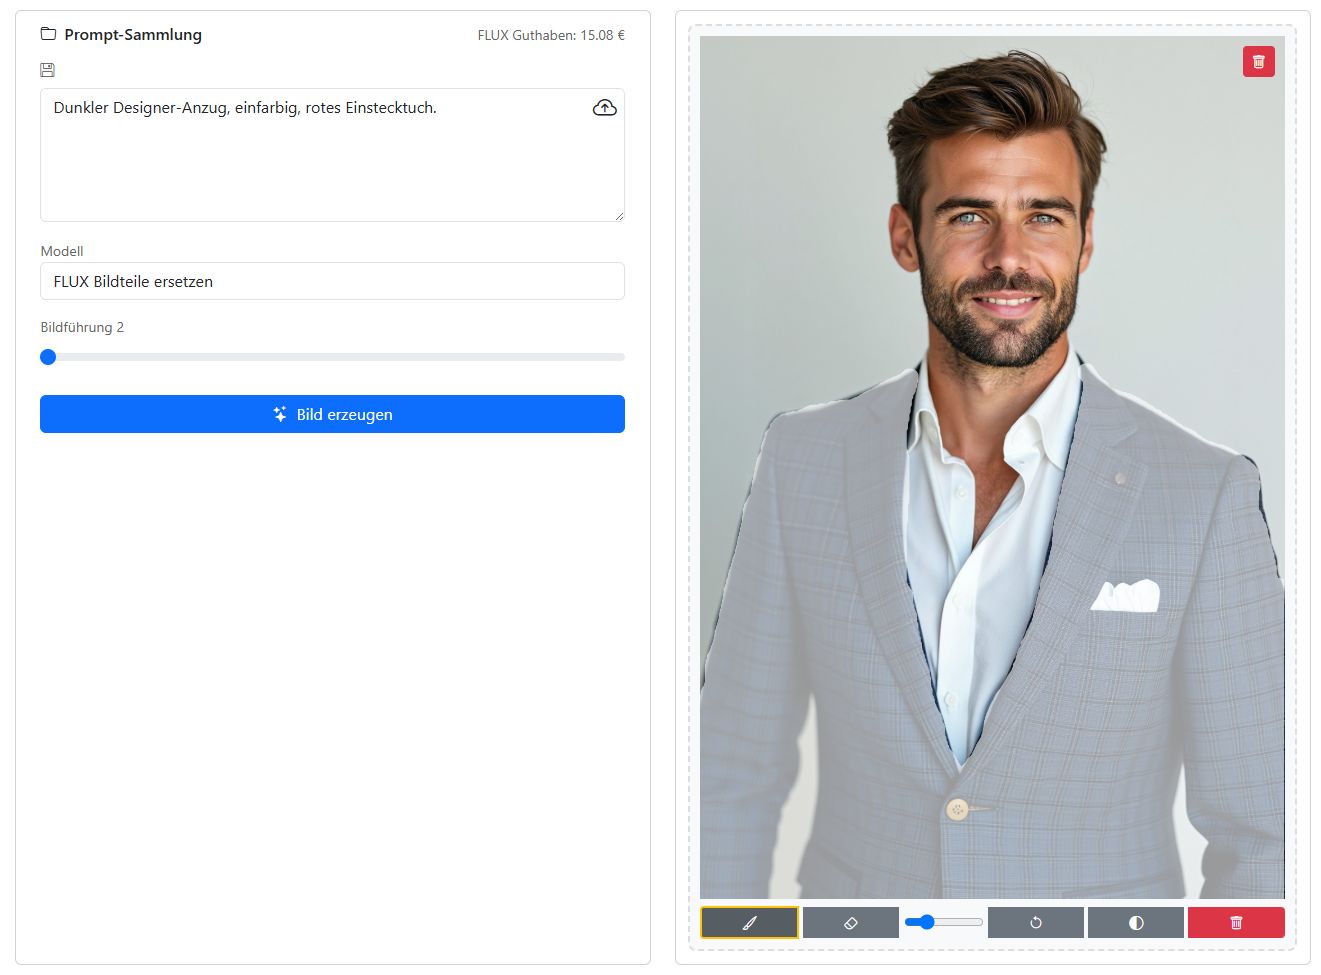
Change fabric texture#
We use the young man again whose suit we extended downward with FLUX Expand. With the brush, we roughly paint over the suit. In the text prompt, we specify that the suit should become plain-colored. He also gets a stylish red pocket square.

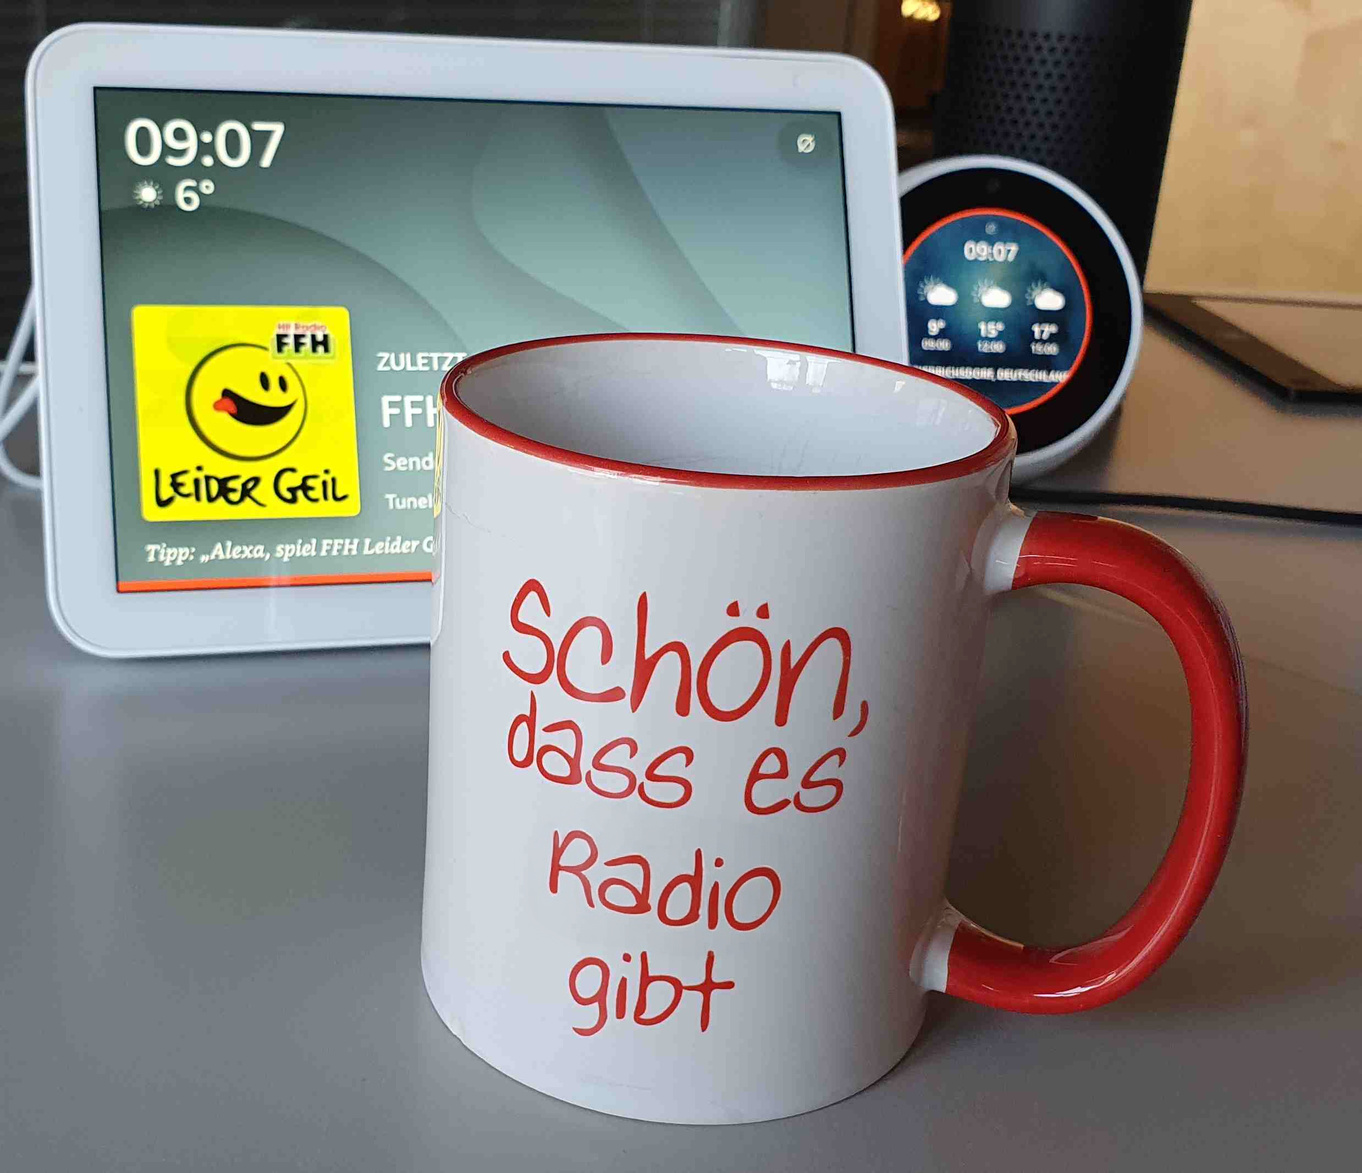
Replace text on an object#
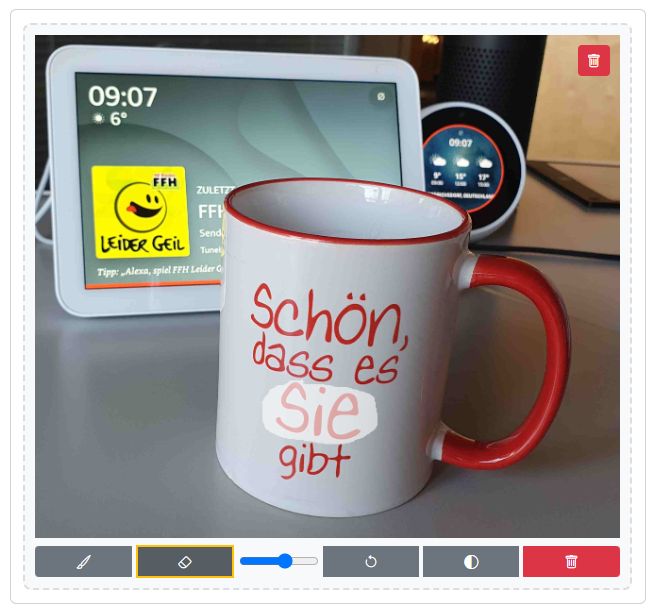
The mug in our office kitchen says “How nice that you exist”. We mark the word “you” with the brush and specify in the text prompt that the word “Radio” should appear there instead. The AI keeps the font style and replaces the word.
Input image: Upload the image you want to edit.
Mask: After uploading the image, you can use the drawing tool to mark the parts that should be replaced. You can do this with the brush or the eraser. Use the slider to set the width of the brush or eraser. You can also invert the selection (mask) or delete it again.
Image guidance: Specify how strongly the input image should influence the marked areas.
FLUX Canny / Depth#
These two models use structural guidance. Structural guidance means that the AI image generator recognizes and uses certain features of an image, such as its outlines or depth (in other words, how far forward or backward something appears in the image). Two technical methods are used for this:
Canny (edge detection): Here, the AI recognizes the most important edges and outlines in the image.
Depth: Here, the AI recognizes which parts of the image are closer to the viewer and which are farther away—essentially creating a depth map.
With FLUX Canny, you can use threshold values to determine how strongly the edges influence the image.
What can you do with it?#
With structural guidance, the basic structure (the image’s “framework”) is preserved even when you modify it using AI. For example, you can enter a text describing how the image should be changed (such as “turn the photo into a painting in the style of Van Gogh”). Even so, the method ensures that the important lines, shapes, and spacing in the image remain the same.
Example applications:
You want to age a portrait (e.g. “what would I look like as an old person?”): facial features and contours are preserved, but the skin is aged realistically.
You have an image of a car and want to test how it would look with different paint finishes or materials without changing the design.
For comic or game developers: a draft can be transferred into different visual styles without losing proportions and basic shapes.

What is this especially useful for?#
This is especially useful when you want to change the surface (“texture”) of an image without disturbing the subject or its arrangement. For example, you can:
Transform a landscape photo, for example into a comic or watercolor style, while keeping the outlines of trees, paths, and houses intact.
Give an image of a dress a new fabric texture, so that it looks as if it were made of denim instead of cotton—while the shape and folds stay the same.
Enhance architectural shots, for example by virtually redesigning a plain house with a different facade while keeping the windows and doors exactly in place.
Combine tools#
We use several FLUX tools one after another to place our AI-Tools logo in an Easter landscape.
This is the logo we upload:
Using FLUX Canny, we place it floating above a basket of eggs in a spring meadow. The logo should glow golden in the morning sun. The AI keeps the size and position.
Now we use FLUX Expand Image. We extend the image slightly downward and significantly to the left. This pushes the logo farther into the background. While expanding, we prompt that a little Easter bunny should be sitting on the left.
Label AI-generated images#
Article 50 of the EU AI Act requires AI-generated images to be labeled as such.
Visible labeling: A badge, overlay, or notice displayed wherever the image appears. For example: “This image was generated with AI” or a corresponding symbol.
Machine-readable labeling: Metadata embedded in the image that contains information about its AI generation. For example: the DigitalSourceType field in the generated image’s XMP metadata.
The AI-Tools automatically add metadata indicating that the image was generated with AI. This uses the IPTC Photo Metadata Standard 2025.1 (November 2025).
For every AI-generated image you download from the AI-Tools, you will find the following entries in the metadata:
XMP:DigitalSourceType: https://cv.iptc.org/newscodes/digitalsourcetype/trainedAlgorithmicMedia
XMP:CreatorTool: <modelname> (e.g. “gpt-image-2”)
XMP:MetadataDate: Image creation date, e.g. “2026:06:16 07:42:10+00:00”
Your content management system (CMS) or digital asset management system (DAM) can read this metadata and automatically add visible labeling on the website or in the media library.
Costs#
Costs
If you generate images with GPT Image, your stored OpenAI or Microsoft account will be charged. The same applies to generating images with Gemini if you have provided an API key to the AI-Tools. For FLUX and Gemini without your own account, we provide you with credit that you can use for image generation. You can see your current balance at the top right above the prompt input. If your credit runs out, you can top it up again by sending an email to info@radio-creator.com.
Prices for the individual FLUX models per image generation:
FLUX.2 Pro: from €0.06 at a resolution of 1K.
FLUX.2 Max: from €0.14 at a resolution of 1K.
FLUX.2 Flex: from €0.12 at a resolution of 1K.
FLUX.2 Klein: from €0.03 at a resolution of 1K.
FLUX Pro: €0.08.
FLUX Context Pro: €0.08.
FLUX Context Max: €0.16.
FLUX Ultra: €0.12.
FLUX Expand Image: €0.10
FLUX Replace Image Parts: €0.10
FLUX Depth depth detection: €0.10
FLUX Canny edge detection: €0.10
Gemini charges for input tokens (prompt and input images) and output tokens (generated image). An image generated with Gemini costs about €0.08.
Gemini 3 uses significantly more tokens for high-resolution 4K images. A 4K image costs about €0.48.
Gemini 3.1 is significantly faster and less expensive than Gemini 3. A 1K image costs about €0.14, and 4K images about €0.30.