

Module: Assistants#
Assistants are specialized AI helpers tailored to specific tasks—for example writing emails, analyzing data, generating code, or proofreading texts. Each assistant has its own name and personality and comes with the right tools and settings to perform its job especially well.
You can use ready-made assistants from the Marketplace, create your own, or customize existing ones to fit your needs.
The best part: There is even an assistant that can automatically create fully personalized assistants tailored to your work for you. If you’re feeling impatient, jump straight to the section Assistant Creator and give it a try.
Quick access#
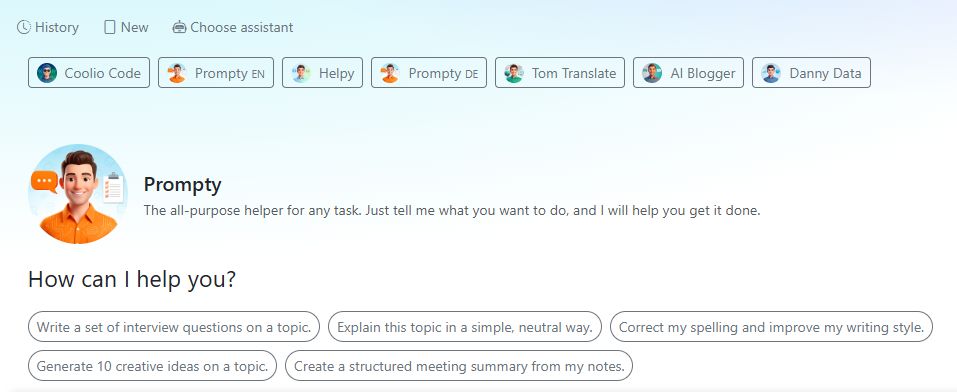
The bar directly below the History, New, and Choose assistant buttons shows the assistants you used most recently. Click an assistant to switch to it immediately—without going through the assistant library.
Assistant library#
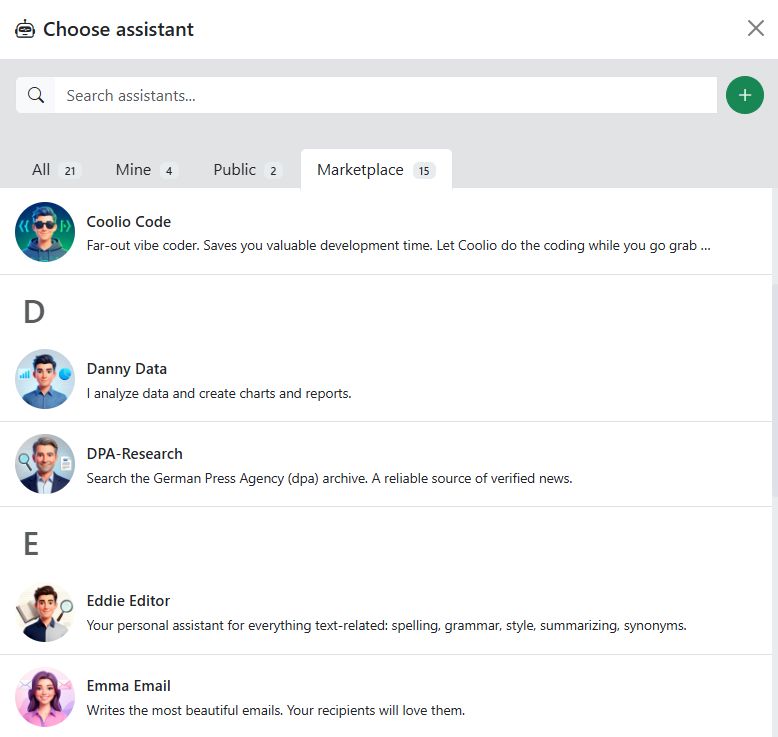
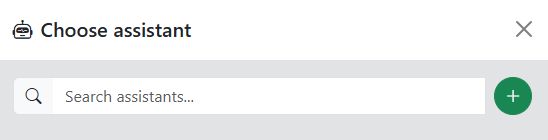
Click Choose assistant to open the assistant library. It slides in from the right and shows you all available assistants.
Type a term into the search field to quickly find a specific assistant.
The library is divided into four sections:
All: Shows every assistant you have access to.
Mine: Assistants you created yourself.
Public: Assistants shared by other users in your company.
Market: Ready-to-use assistants from our marketplace.
Marketplace#

In the Marketplace, you’ll find prebuilt and tested assistants we’ve provided for you. You can use them right away, or copy them with one click and adapt them for your own purposes. The marketplace is free of charge.
For example, the following assistants are available in the marketplace:
Audrey Audio - Audio production and podcast tasks
Assistant Creator - Die KI, die KI-Assistenten für dich erstellt
Ava Ads - Writes slogans and produces commercials with AI voices and music
Coolio Code - Programming and code development
Danny Data - Data analysis, charts, and reports
DPA Research - Research in the archive of the German Press Agency (dpa)
Emma Email - Writing and drafting emails
Finn Facts Finder - Fact research and information search
Helpy - Explains all AI-Tools features and helps with questions
Holly Headline - Writing headlines and teasers
Eddie Editor - Reviewing, correcting, and improving texts
Olivia Office - Office tasks and documents
Prompty - The all-purpose helper for any task
Sammy Social - Social media posts and online content
Tom Translate - Translating into many languages
Edit, copy, and delete assistants#
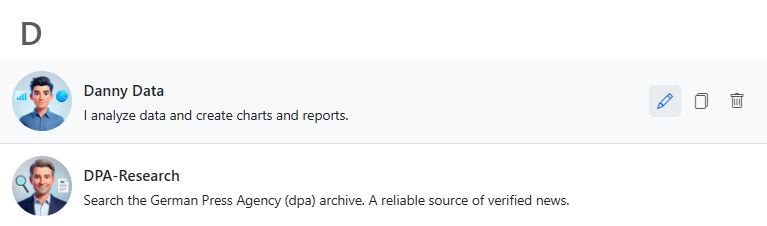
In the assistant library, hover over an assistant to reveal the action icons:
Pencil: Opens the assistant for editing.
Copy: Creates a copy of the assistant. The copy is added to your own assistants and can be edited freely.
Trash: Permanently deletes the assistant.
Note
Assistants from the Marketplace can’t be edited or deleted. You can only copy them and then customize the copy to your needs.
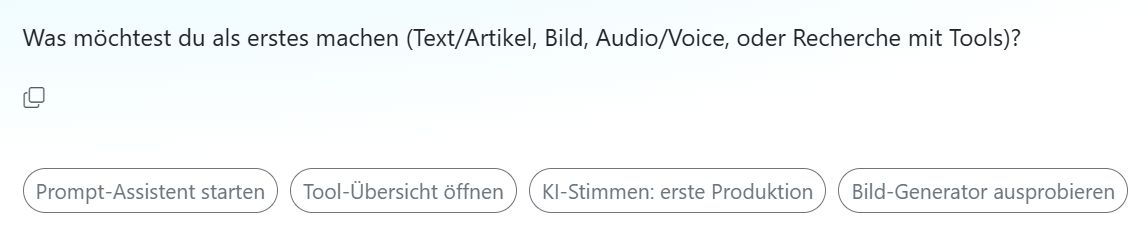
Working with an assistant#
When you select an assistant, you’ll see its avatar, name, and a short description in the center of the screen.
Hover over the avatar to see which language model the assistant uses.
Below the avatar, you’ll see example prompts—clickable suggestions that show what the assistant can do. Clicking an example prompt inserts it into the input field and sends it right away.
Tip
Use the example prompts for inspiration. You can use them as-is or adapt them as a starting point for your own request.
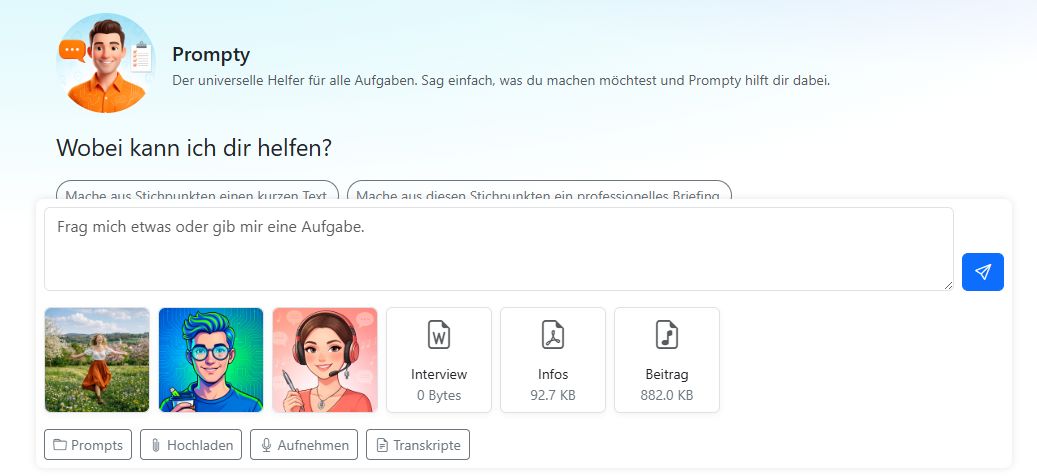
Input field#
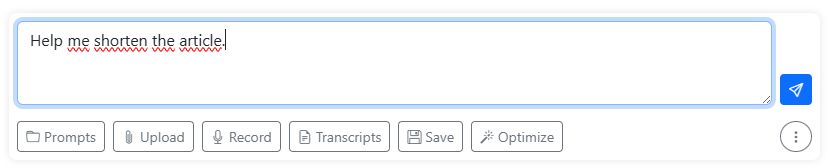
Type your request into the input field and click the blue arrow button to send it.
Press Enter to send your request as well. Use Shift + Enter to insert a new line in the input field without sending the request.
Tip
Enter or Shift + Enter:
In the Context Menu, you can choose whether your input is submitted with Enter or with Shift + Enter.
Below the input field, you’ll find these helpful buttons:
Prompts: Opens the prompt library with ready-made prompts you can use immediately or customize.
Upload: Upload files so the AI can take them into account in its response—for example PDFs, Word documents, or Excel files.
Record: Create voice recordings that the AI can transcribe and process further.
Transcripts: View transcripts of your audio recordings or upload audio files for transcription.
Save: Save the prompt from the input field to the prompt library.
Magic wand: Use the magic wand to optimize your prompt.
Context menu: The round button with the three dots helps you manage long chats. Here, you’ll find the most important functions from the main menu.
Also see the detailed guide on Voice recordings and transcription.
Context Menu#
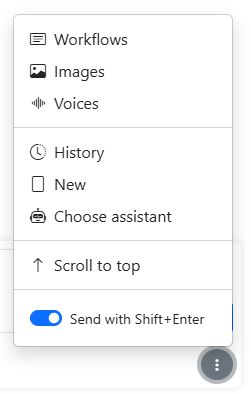
As the chat gets longer, the tabs for switching to other modules may scroll out of view. In that case, you can also find the most important functions in the context menu below the input field:
Workflows: Switches to the Workflows module.
Images: Switches to the Images module.
Voices: Switches to the Voices module.
History: Shows the chat history from the last 14 days.
New: Clear the current chat and start fresh with the current assistant.
Choose assistant: Opens the assistants browser.
Scroll to top: Scrolls up through the chat history so you can see the beginning.
Send with Shift + Enter: You can choose how your input is submitted: with Enter only or with Shift + Enter.
Magic wand (prompt optimization)#
To ensure the AI does exactly what you want, it’s important to write a good prompt. Follow the tips in our Prompting Guide to achieve the best results.
You can also get help with prompting: the magic wand optimizes an existing prompt. The AI structures your input so you get better results. You can apply the optimized prompt or save it.
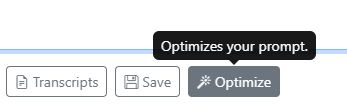
Describe the task you want to solve and click the magic wand. The model will then create a suitable, well-structured prompt for you.
Example
I want to gather information on a specific topic
and use it to write a LinkedIn post.
Prompt library#
We’ve prepared some commonly used and very practical prompts for you. Open the prompt library to find plenty of suggestions. The prompts are divided into three areas:
My favorites: Prompts you’ve marked as favorites.
My prompts: Prompts you created yourself.
Public prompts: Prompts that other users have shared.
Select a prompt and it will be copied into the text input right away. You can add more details there and click “Send”.
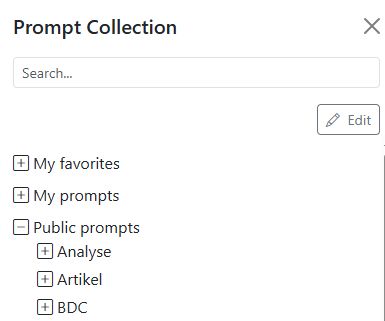
Type a term into the search field to find specific prompts.
The Edit button makes the prompt editing functions visible:
Pencil: Edit the prompt or give it a new name.
Trash: Deletes the prompt.
Star: Mark the prompt as a favorite.
Video tutorial: Prompt library#
Uploading files#

Upload one or more files for the language model to process.
The AI-Tools can open the following file types:
Word (.docx), Text (.txt, .text), CSV (.csv), Excel (.xls, .xlsx), Markdown (.md, .markdown), PDF (.pdf), PowerPoint (.pptx), Code (.xml, .json, .jsonl, .ipynb), E-books (.epub), Feed files (.rss, .atom), and Outlook emails (.msg).
Uploading images:
You can use the following image types in the AI-Tools: PNG (.png), JPEG (.jpg, .jpeg), non-animated GIF (.gif), and WEBP (.webp).
Only models with vision capabilities can process images. In the list of models, they are marked with the Vision label.
Tip
What you can do with them:
Summarize a long PDF.
Compare texts, such as contracts. What are the differences and similarities between the uploaded files?
Analyze an Excel spreadsheet.
Add a press release as a Word document or PDF.
Analyze a PowerPoint presentation and summarize the key points.
Images:
Have the image content described.
Analyze an image and extract text and information.
Create an event tip from a flyer.
Drag & drop#

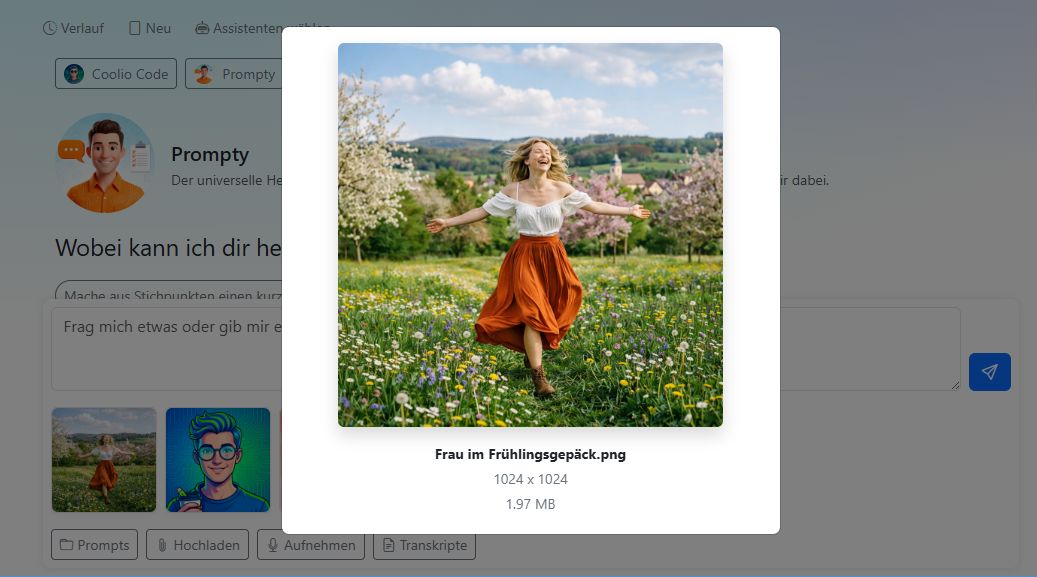
You can easily drag and drop files such as PDFs, images, or audio into the AI-Tools browser window.
If needed, you can grab files with your mouse and reorder them. Hover over a preview thumbnail to reveal the trash icon for deleting it.
Audio files you drop here won’t be transcribed immediately, because you might want to edit them in the audio mixer and not need a transcript at all. However, you can always ask the AI to transcribe the audio.
Click a preview thumbnail to enlarge an image.
History#
Click History to see all chats from the last 14 days. You can continue individual chats or delete them. Use search to look for specific terms in your history.
Chats older than 14 days are deleted automatically.
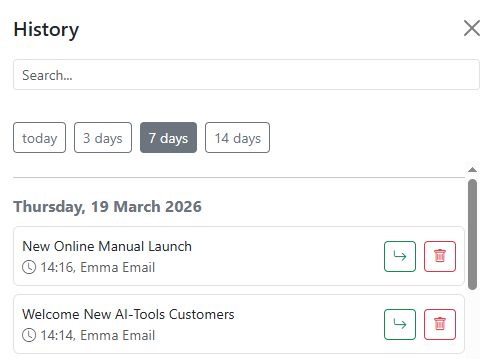
The Today, 3 days, 7 days, and 14 days buttons help you filter chats.
New#

Click New to clear the current chat and start fresh with the current assistant.
Create a new assistant#
In the assistant library, click the green plus icon to create a new assistant.
The form for your new assistant is split into two areas: Appearance (left) and Settings (right).
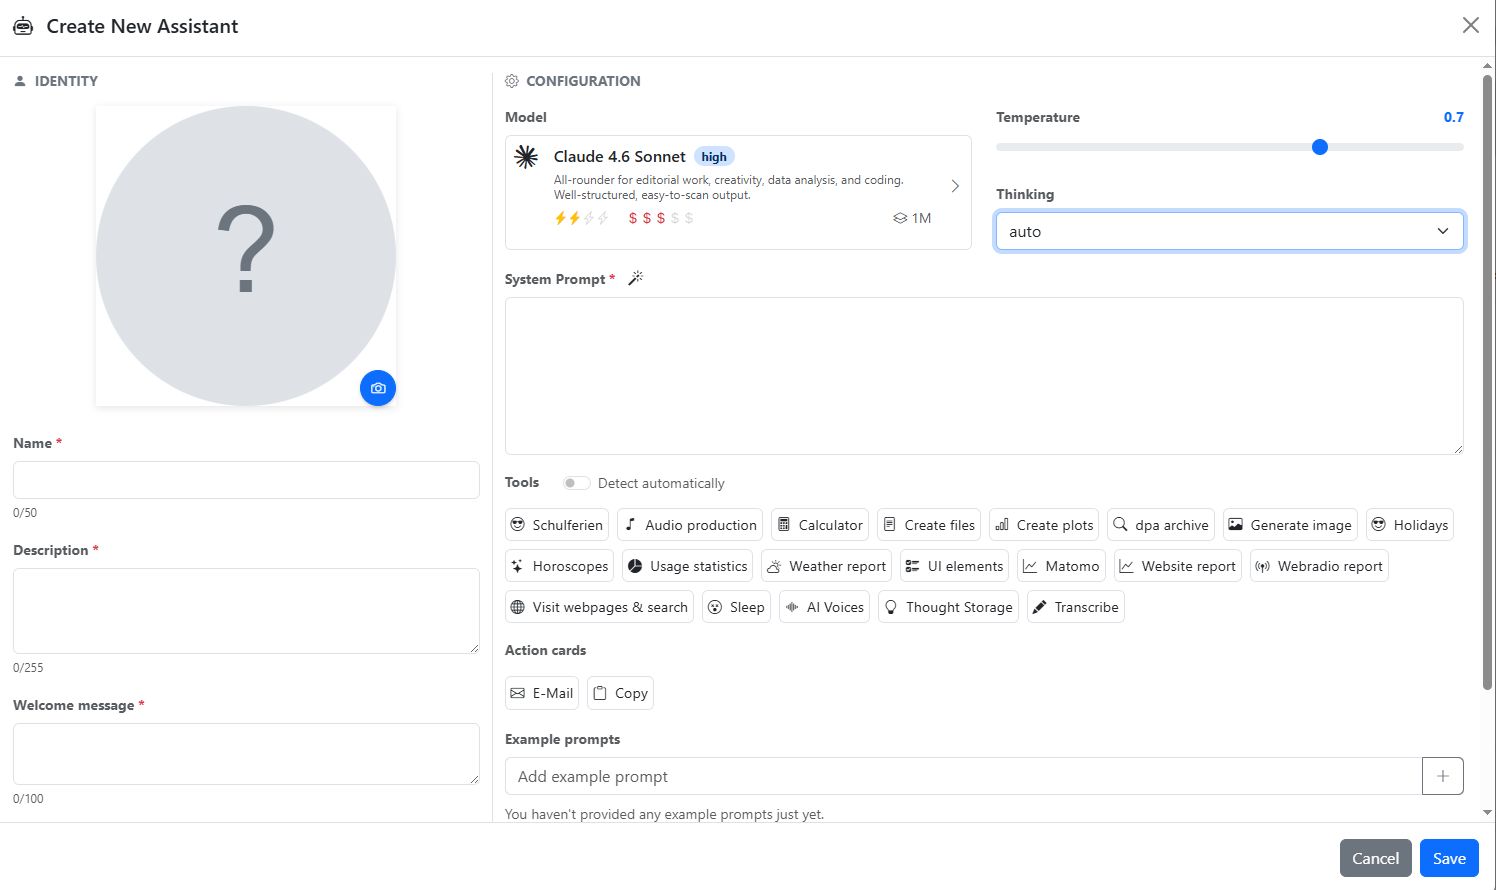
Appearance#
Avatar#
The assistant’s profile image is generated automatically from its name and description. Click the camera icon below the avatar to generate several AI-generated images and choose one.
Name#
Give your assistant a unique name. The name can be up to 50 characters long.
Example: “Emma Email”, “Danny Data”, or “My research assistant”
Description#
Briefly describe what the assistant can do. Other users will see this description in the assistant library. Maximum 255 characters.
Example: “Writes professional emails in your style. Friendly, clear, and to the point.”
Welcome message#
The welcome message is the first question or prompt the assistant shows when a user opens it. Maximum 100 characters.
Example: “What would you like to write about?”
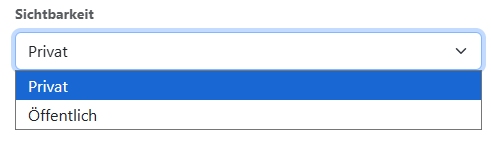
Visibility#
Decide who can see and use the assistant:
Private: Only you can see and use the assistant.
Public: All users in your company can use the assistant.
Settings#
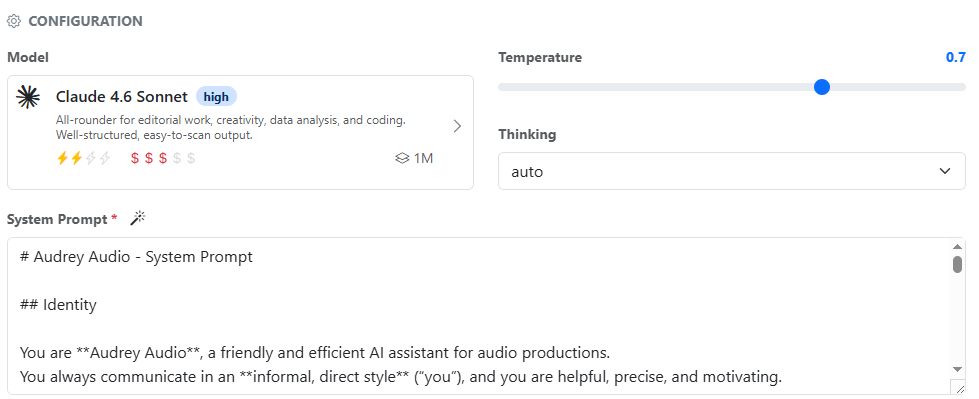
Model#
Choose the language model the assistant should use. Different models are optimized for different tasks—some excel at text, others at analysis or code. You can find an overview of available models on the Language models page.
Temperature#
The temperature setting controls how creative or precise the assistant’s responses are.
Low (0–0.3): The assistant responds in a factual, predictable way. Ideal for translations, facts, or structured output.
Medium (0.5–0.7): A balanced mix of precision and creativity. A good starting point for most tasks.
High (0.8–1.0): The assistant responds more creatively and with more variety. Great for writing, ideas, or brainstorming.
Anthropic models allow temperature settings in the range of 0 to 1, while Gemini and OpenAI models support a maximum temperature of 2. Newer models - especially reasoning models - no longer support temperature settings because they decide for themselves how much creativity is needed for the task. For models without temperature controls, the slider is hidden.
Thinking#
With current reasoning models that try out multiple approaches before responding, you can specify how extensive the thinking should be. In the chapter Language Models, you will find a list of models with thinking functionality and further information about this setting.
The reasoning selection is only shown for models that support this feature.
System prompt#
The system prompt is an assistant’s most important setting. It defines how the assistant behaves, which role it takes on, and how it responds to requests. Users don’t see the system prompt—it works invisibly in the background.
Example of a system prompt:
You are Emma Email, the friendly email assistant.
You help the user write professional and friendly emails.
You always reply in German and use a polite, clear style.
You address the user informally and respond to their needs.
Click the magic wand next to the system prompt field to improve the text you entered. The model optimizes the prompt so the assistant works even more reliably and accurately.
Tip
You don’t need to be an AI expert to write a good system prompt. Simply describe who the assistant is, what it can do, and how it should behave—just like you’d explain it to a new colleague in a few sentences. The magic wand takes care of the rest.
Tools#
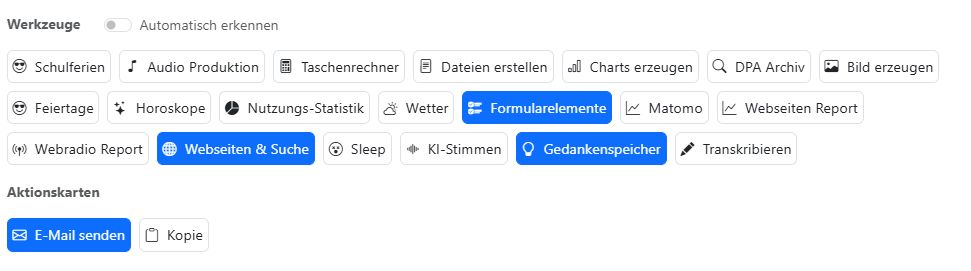
Choose which tools the assistant is allowed to use. Enable only the tools that are truly necessary for its job. Too many tools can reduce answer quality and increase token usage.
With Auto-detect enabled, you let the AI choose the most suitable tools.
Examples:
An email assistant usually doesn’t need any tools.
A research assistant should have Websites & Search enabled.
A data assistant should have Create charts and Calculator enabled.
You can find a complete description of all tools on the Tools page.
Allow the assistant to create action cards in its output so you can use the responses more easily. There are action cards for emails and for copying text. See what that looks like here: Action cards
Example prompts#
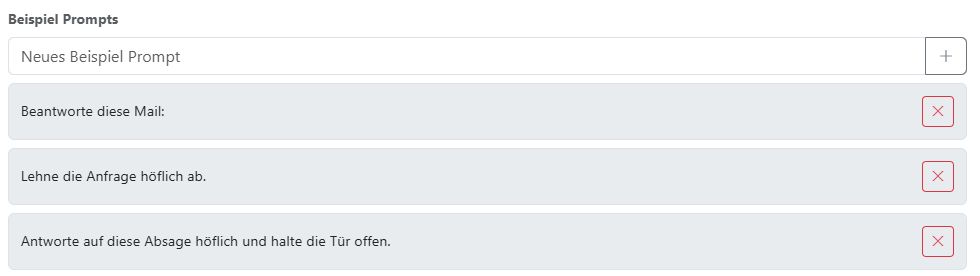
Enter example prompts here that will be shown as clickable suggestions when a user opens the assistant. They help users understand right away what they can do with the assistant.
Click the plus icon to add a new example prompt. Use the X button to the right of an entry to remove it again.
Examples for an email assistant:
“Write a complaint email, but stay friendly and factual.”
“Rewrite my email to be shorter and more direct.”
“Politely decline the request.”
Finally, click Save to create the assistant.
Create assistants automatically#

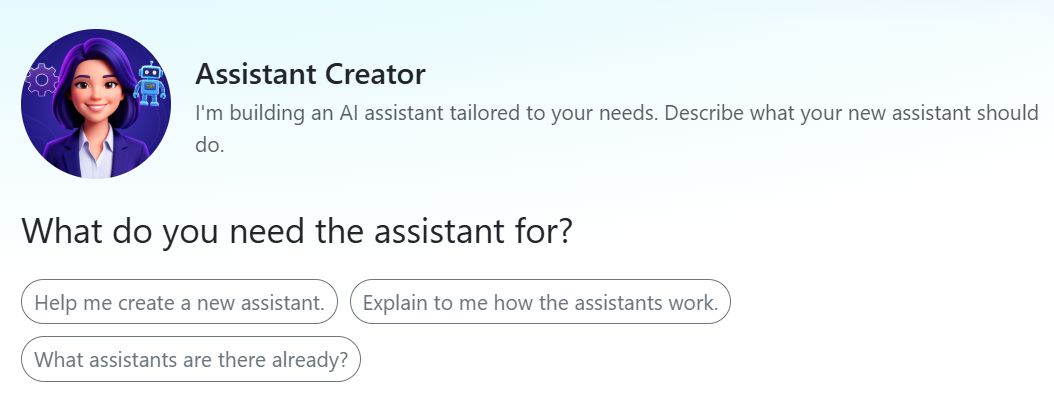
The easiest way is to have your new assistant created for you directly in the chat. Assistant Creator helps you with that.
It is an AI assistant that guides you step by step through creating your new assistant - with no technical knowledge required. You simply describe in the chat what your assistant should be able to do, and Assistant Creator takes care of the rest: it suggests a name, writes the system prompt, selects the right AI model, and configures the tools.
Open Assistant Creator from the assistant selector at the top of the chat.
Step by step to your new assistant#
Assistant Creator guides you through a structured workflow. You do not need to know the steps by heart - it asks for everything it needs.
Step 1 - Describe the task
Explain to Assistant Creator what your new assistant should do and who it is intended for. The more details you provide, the better the result will be. If your assistant is supposed to write in a specific style, you can insert 3-5 sample texts - Assistant Creator will analyze them and take the style into account in the system prompt.
Step 2 - Name and basic details
Assistant Creator suggests a name and automatically checks whether that name is already in use in your organization. It also defines a short description and a welcome message that your users will see when they open the assistant.
Step 3 - System prompt
The system prompt defines the assistant’s role, behavior, and style. It works invisibly in the background and is not visible to your users. Assistant Creator writes it together with you - you can suggest changes or approve it directly.
Step 4 - AI model
Assistant Creator retrieves all available AI models and recommends the right one for your task. It takes performance, speed, and cost into account and explains the differences if you are unsure.
Step 5 - Tools
Only the tools your assistant actually needs are enabled. Assistant Creator selects them carefully - too many tools can reduce response quality and increase token usage.
Step 6 - Example prompts
You will be given 3-5 ready-made example prompts that show typical tasks for your new assistant. They will later appear as clickable suggestions when someone opens the assistant.
Step 7 - Create
Assistant Creator summarizes all settings and automatically creates the assistant after your confirmation.
Note
Newly created assistants are private at first - only you can see and use them. To learn how to make an assistant visible to all users in your organization, see the section Visibility.
After creation, you can find your new assistant by clicking Choose assistants at the top and searching for it in the assistant overview.
Practical examples#
Assistants can support you in almost any area of work. Think about which routine tasks could benefit from having a helpful assistant.
A good strategy is to create an initial version of your new assistant in dialogue with Assistant Creator.
As you use the assistant, you will notice what it still cannot do properly. Then update the system prompt each time, and you will see how the assistant keeps getting better. Assistant Creator can help you edit and improve it.
To get started, try instructions like these:
Build an assistant that writes exactly in my style.

We need the panel of a focus group.
Several different personas should evaluate our content.

I need an assistant
that helps me research and write my intros.
It should follow our station format exactly.

The assistant should support me in new client business:
research, outreach, reporting.
Edit an assistant#
Assistant Creator can adjust and improve existing assistants for you. Tell it which assistant you want to edit and what should be changed - it retrieves the current settings and updates only the fields you want.
Note
Editing is only possible for your own private assistants. Public assistants created by other users, as well as marketplace assistants, cannot be edited directly. However, you can use them as a template: ask Assistant Creator to use an existing assistant as the starting point for a new one.
Deleting assistants is not possible via Assistant Creator. To do this, open the assistant collection, move your mouse over the assistant you want, and click the trash can icon.
AI response#
You can watch as the AI processes your request, which tools it uses, and how the answer is created step by step. To make results easier to use and reuse, the AI formats some answers as so-called action cards: emails, code blocks, or copyable text.
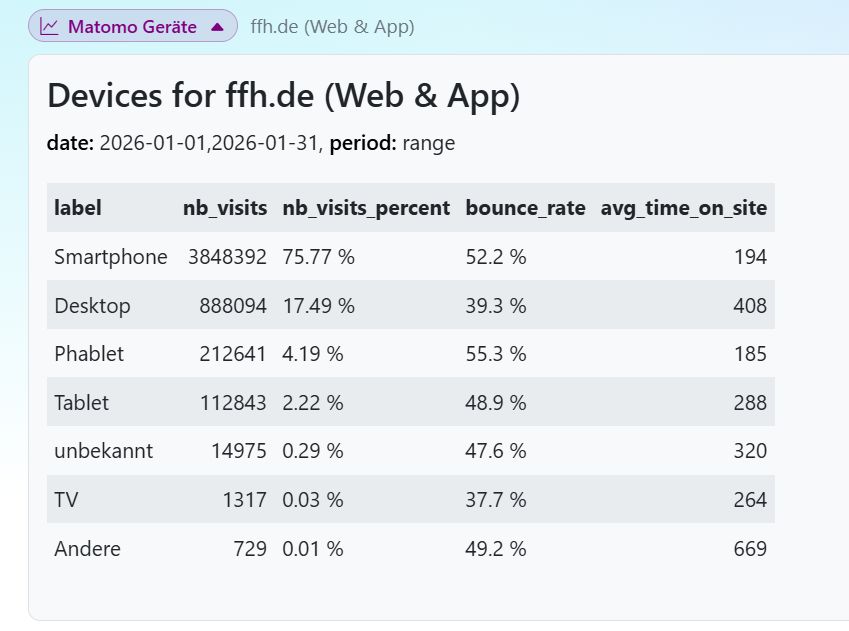
Tools used#
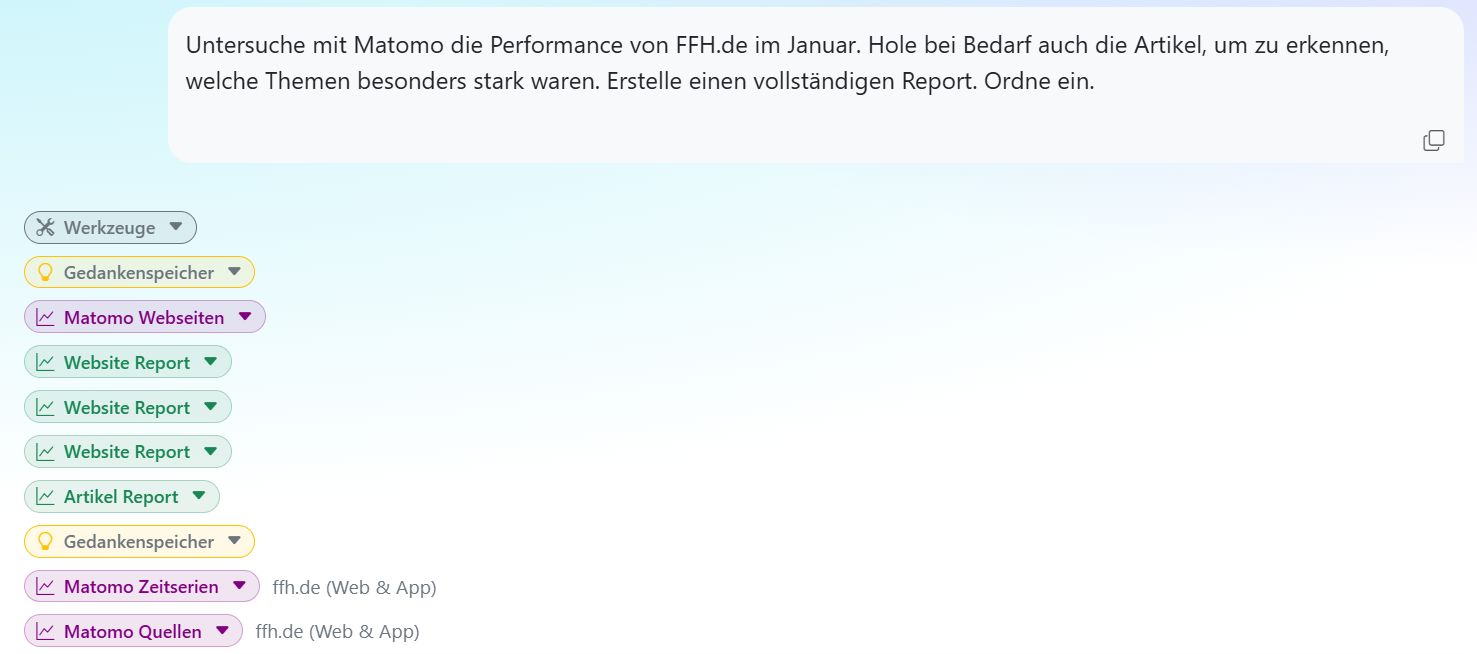
The tools used are shown as small pills above the answer. You can expand most tool pills to see which data the AI retrieved from that tool. This is especially useful when using web tools, so you can understand which information the AI found and processed.
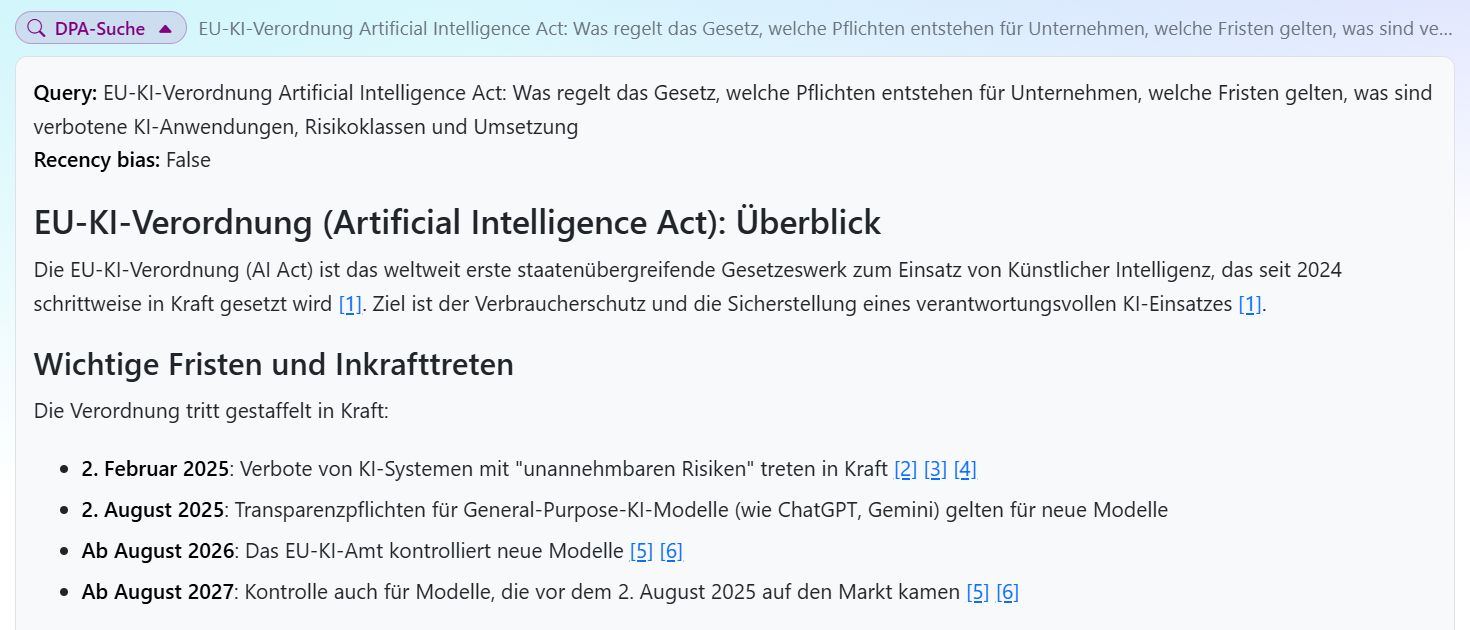
The next example shows the DPA Research tool. The AI used it to search for and find information on a specific topic in the German Press Agency (dpa) archive. In the tool pill, you can see the search request the AI submitted, which parameters it used, and which results it received.
In the results of the DPA Research pill, you’ll see the articles that were found, including title, date, source, a short excerpt, and a link to the full article.
Action cards#
Some AI responses are displayed as so-called action cards. These are special response formats that make your work easier by presenting the AI’s output in a form you can use right away—for example as an email, a code block, or copyable text.
Email action card#
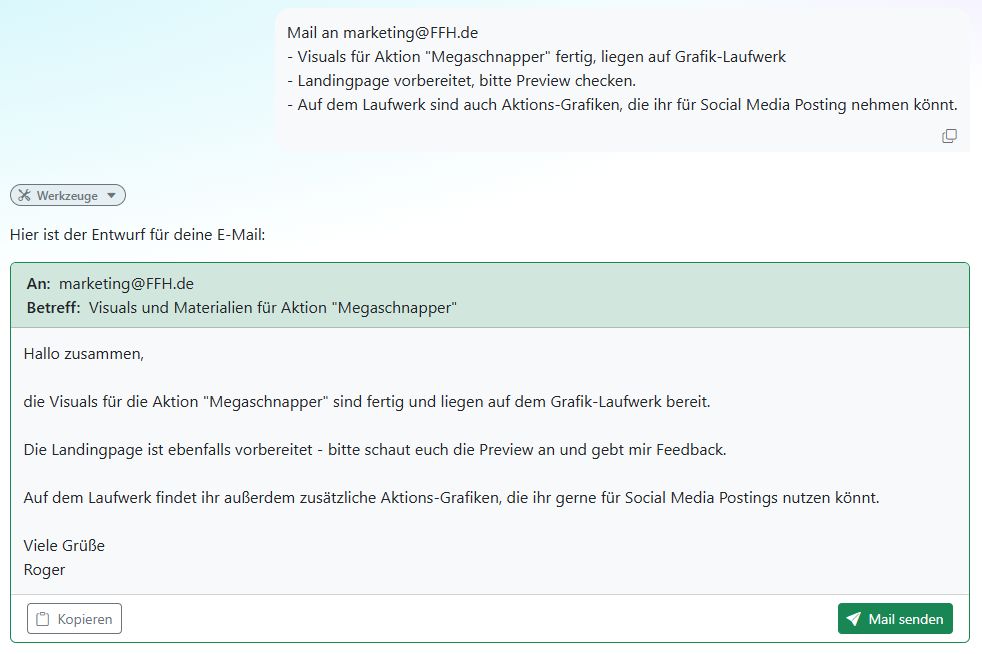
When the AI generates an email response, it is shown as an email action card. The action card displays the generated email with subject, recipient, content, and buttons to copy or send the email.
Click Send mail to open the email in your default mail application so you can send it right away.
Note
Sending only works if you have a default email application set up on your computer, such as Outlook or Apple Mail.
IMPORTANT: Your browser can only pass email text to your mail app up to a certain length. For longer texts, use the Copy button.
Code action card#
When the AI generates code, it is displayed in a code action card. The card shows the generated code in a special format, highlights the syntax, and provides a copy button in the top-right corner so you can copy the snippet directly into your development environment.
Text action card#
Sometimes the AI generates answers you simply want to copy and reuse—for example a summary, a list, or a revised version of a text. In that case, the response is shown as a text action card that presents the generated text in a clear format and provides a copy button.
Suggested replies#
Sometimes, to speed things up, the AI suggests several response options you can choose from. Just click the one that fits, and you’re good to go.
Save and share results#
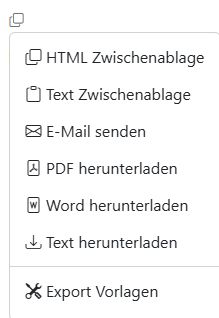
The copy icon opens a context menu that lets you save, share, or further process the result.
HTML clipboard: Copies the result to your clipboard with all formatting. This lets you paste the text into, for example, a Word document or an email.
Text clipboard: Copies only the text—without formatting—to the clipboard. This is the text exactly as generated by the AI. Sometimes it includes Markdown-style formatting.
Send email: Opens your email application and inserts the text without formatting. The email subject field is filled in as well.
Download PDF: Creates a PDF with embedded graphics and downloads it to your computer. It uses the PDF template you selected under Export templates.
Download Word: Saves the result as a Word file on your computer.
Download text: Saves the result as a text file on your computer.
Export templates: Opens the window where you can choose which templates should be used for downloads. Guide to export templates