

External APIs#
Connect the AI-Tools to any application to extend the capabilities of AI. Connect your own software interfaces and integrate the AI-Tools into existing systems. Or call external APIs to retrieve information for specific tasks. The API interface is simple and flexible. You can use it to send and receive data.
You can use all added interfaces in your AI workflows. Optionally, you can also enable the APIs as a tool for the AI. These APIs will then also be available to you with all assistants.
You can list external APIs, create new ones, and test them.
Tip
What you can do with it:
Retrieve weather data.
Query stock prices.
Get school holiday dates for different regions.
Connect AI-Tools to your own CMS.
Use internal databases or analytics data.
Listing APIs#
Administrator rights are required to manage external APIs. Please ask your IT department to add you to the ai-tools-admin permission group. This permission protects external APIs from unauthorized access. An API interface always includes access credentials, which can only be viewed and edited by administrators.
You can find more information about permissions in the Login & Permissions guide.
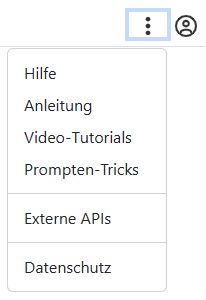
With the ai-tools-admin permission, you will see the External APIs item in the admin menu.
There you can list all external APIs, create new ones, and edit existing ones.
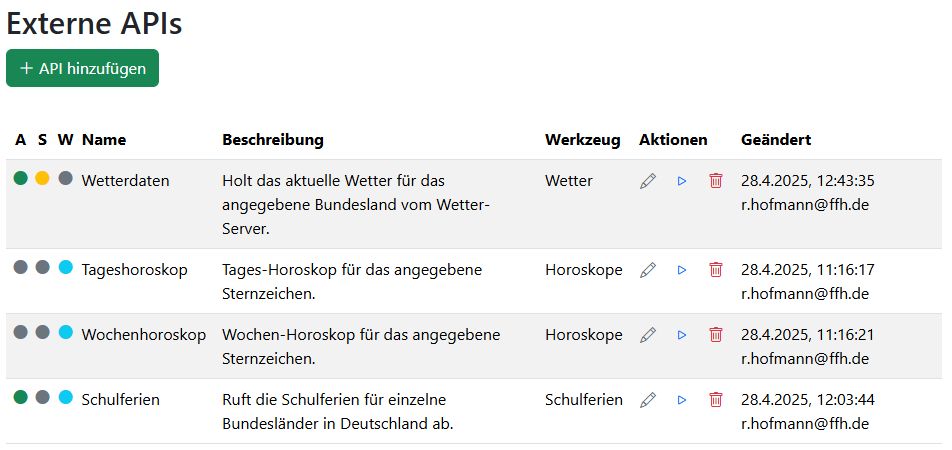
Flags
The flags at the beginning of each row indicate whether the API interface is active and whether it is enabled as a tool for the AI.
Active: The API is active and can be used.
System: The API is marked as a system API. It can only be used in system workflows.
Tool: The API is enabled as a tool for the AI. It is available in prompts and can be used by the AI.
Name
This name is used to display the API in the list and in AI workflows.
Tool
Using this tool name, the API appears in the assistant settings. Multiple APIs can be grouped under the same tool name.
Actions
Edit (pencil): Open the API interface for editing.
Test (play): Test the API interface. You can test the API with a sample request and display the response.
Delete (trash can): Delete the API interface. The API will be deleted and cannot be restored. If you only want to deactivate the API interface, you can do so in edit mode.
Modified
Here you can see when and by whom the API was last edited.
Add API#
Create a new API interface by clicking the Add API button. You will then be prompted to enter the required information to configure the API.
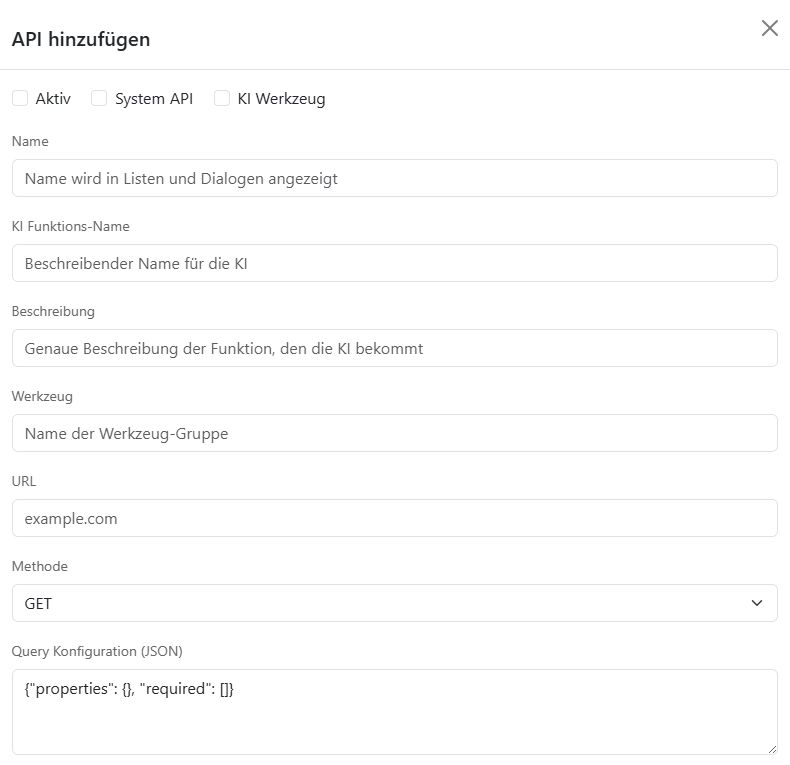
Let’s go through the individual fields:
Flags#

Active: The API is active and can be used.
System API: The API is marked as a system API. It can only be used in system workflows.
AI tool: The API is enabled as a tool for the AI. It is available in prompts and can be used by the AI.
Name#
Assign a unique name to the API. This name is displayed in the API list and in AI workflows.
AI function name#
This is the name as the AI sees it. It is therefore especially important that the name is unique and self-explanatory. Write the name without spaces or special characters. Use only lowercase letters and underscores.
Examples: get_weather, get_stock_price, get_school_holidays.
Description#
The description is for the AI. Describe exactly what the API does and how it can be used. This helps the AI understand the API better and use it correctly for tasks.
Example: “Retrieves school holidays for individual federal states in Germany.”
Tool#
Multiple APIs can be grouped under the same tool name. This is especially useful if you have several APIs with similar functions or that work together. In the assistant settings, only one tool will then be shown, combining the different APIs.
Example: Horoscopes
URL#
This is the URL of the API you want to call. The URL must start with “http://” or “https://”.
Method#
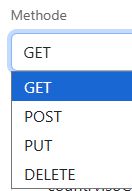
Select the method you want to use to call the API: GET, POST, PUT, DELETE.
Query configuration (JSON)#
If the API expects query parameters in the URL, you can define them here. If there are no query parameters, keep the default empty configuration.
Empty configuration:
{
"properties": {},
 "required": []
}
Example of an API that expects query parameters:
{
"required": [
    "countryIsoCode",
    "validFrom",
    "validTo"
],
"properties": {
    "validTo": {
    "type": "string",
    "description": "End of the date range: YYYY-MM-DD"
    },
    "validFrom": {
    "type": "string",
    "description": "Start of the date range: YYYY-MM-DD"
    },
    "countryIsoCode": {
    "enum": [
        "DE"
    ],
    "type": "string",
    "description": "ISO 3166-1 code of the country"
    },
    "subdivisionCode": {
    "enum": [
        "DE-BY",
        "DE-HE",
        "DE-BB",
        "DE-BE",
        "DE-BW",
        "DE-HB",
        "DE-HH",
        "DE-MV",
        "DE-NI",
        "DE-NW",
        "DE-RP",
        "DE-SH",
        "DE-SL",
        "DE-SN",
        "DE-ST",
        "DE-TH"
    ],
    "type": "string",
    "description": "Code of the subdivision or region in Germany. E.g. DE-BY: Bayern."
    }
}
}
For each parameter (property), type and description must be specified. Optionally, you can also specify enum if the parameter is only allowed to accept certain values.
If you mark the external API as an AI tool, the JSON configuration is passed to the AI. It will then know how to use the API.
Data configuration (JSON)#
If the API expects a body, you can define it here. If there is no body, keep the default empty configuration. The configuration is in JSON format and is structured exactly like the query configuration.
Default values (JSON)#
Enter the default values for the query parameters and the body here. The default values are used when you call the API without parameters. The individual values you enter here are inserted according to the configuration in the URL (query configuration) or in the body (data configuration).
Authentication#
To access external APIs, the system supports various authentication methods. The authentication information is specified in the Authentication field of the API definition.
The following methods are supported:
1. Bearer header
When using the header type, an HTTP Authorization header in the format Bearer <token> is added.
Example:
{
     "type": "header",
     "token": "<YOUR_TOKEN_HERE>"
}
2. x-key header
When using the x-key type, an HTTP x-key header is added with the specified value.
Example:
{
     "type": "x-key",
     "x-key": "<YOUR_X_KEY_HERE>"
}
3. Key/value header
When using the key_value type, the specified key/value pair is added to the request as an HTTP header.
Example:
{
     "type": "key_value",
     "header_key": "Custom-Key",
     "header_value": "Custom-Value"
}
4. Basic authentication
When using the basic type, an HTTP Authorization header is set in the format Basic <username>:<password>. Note: The string is not base64-encoded. If necessary, check whether this is compatible with the target API.
Example:
{
     "type": "basic",
     "username": "<USERNAME>",
     "password": "<PASSWORD>"
}
5. Query parameter authentication
When using the query type, the key/value pairs specified in query_params are appended to the request as additional URL parameters.
Example:
{
     "type": "query",
     "query_params": {
         "api_key": "<YOUR_API_KEY>",
         "other_param": "value"
     }
}
Timeout#
Enter in seconds how long the AI-Tools should wait at most for a response from the API. If the timeout is exceeded, an error message is returned.
Testing the API#
Before using the API in AI workflows, you should test it.
To do this, go back to the list of external APIs and click the Play button. The dialog for testing the API will open.
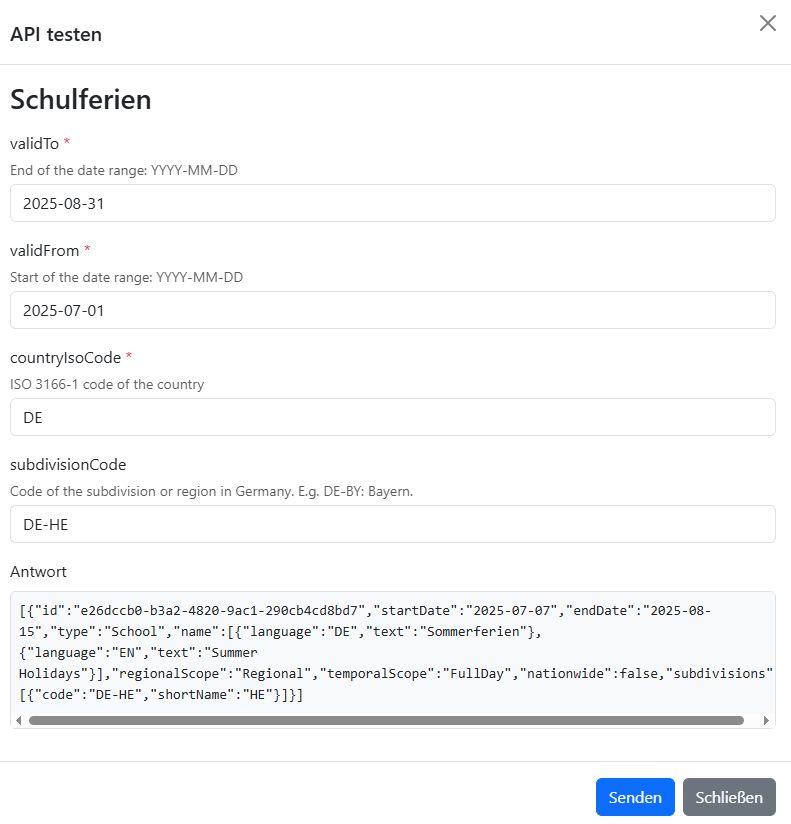
All input fields that you specified in the API definition are displayed here. Enter the values you want to test and click Send.
In the Response field, you can see the API response.
Workflow with external API#
Enabled external APIs are available to you in AI workflows. To do this, go to the Workflows module, open the editor, and add a new step.
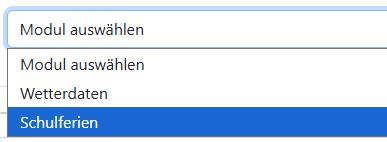
Select API#
In the first drop-down menu, select Connect.

In the drop-down menu to the right, you will see all the names of the APIs you defined earlier. Now select the API you want to use.
Fields#
Expand the API properties to see the fields. These are exactly the fields you specified in the API definition.
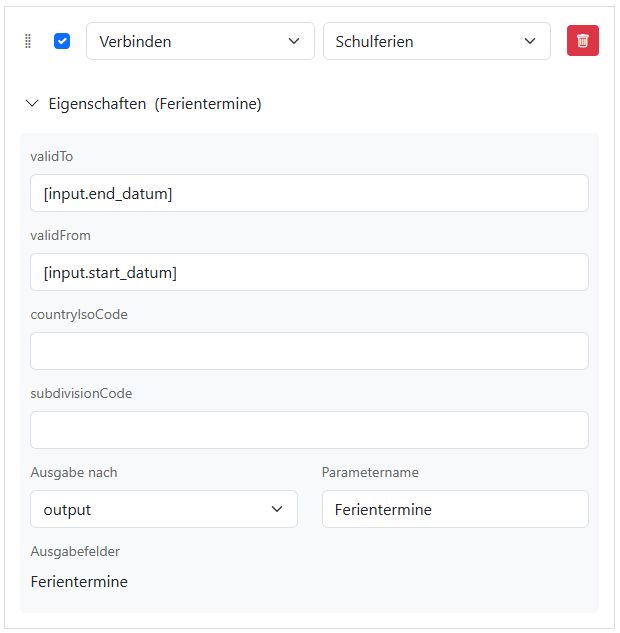
In the fields, you can enter fixed values or use placeholders.
[input.start_datum] is an example of a placeholder that you defined under Input fields in the workflow. Here, the user input start_datum would be inserted into the API.
Learn more about internal storage areas and placeholders in the Placeholders guide.
Output to#
Under Output to, you can choose where the API response should be saved. The API response is always saved as text.
In the example, we defined the variable Ferientermine in the output storage. You can use it in subsequent prompts with the placeholder [output.Ferientermine].
JSON return values#
If the API returns a JSON response with key/value pairs, the values are stored in the internal api storage using the key as the name.
Example API response:
{
    "date": "2025-04-28",
    "report": "Sunny days with mild temperatures await you.",
    "warning": "No warning"
}
You can now use the date with the placeholder [api.date]. The other two values are also stored in the internal api storage and can be retrieved with [api.report] and [api.warning].